本文最后更新于:13 天前
特定场景解决方案 第一节 CountDownLatch 效果:指定一个操作步骤数量,在各个子线程中,每完成一个任务就给步骤数量 - 1;在步骤数量减到0之前,CountDownLatch 可以帮我们把最后一步操作抑制住(阻塞),让最后一步操作一直等到步骤被减到 0 的时候执行。
1、班长锁门 有六名同学在值日,班长负责锁门。班长必须确保所有同学都离开教室再锁门。
1 2 3 4 5 6 7 8 9 10 11 12 13 14 15 16 17 18 19 20 21 22 23 24 25 26 int stuNum = 6 ;new CountDownLatch(stuNum);for (int i = 0 ; i < stuNum; i++) {1 );new Thread(()->{" " + num + "号同学离开教室" );"班长锁门" );
2、集齐七颗龙珠召唤神龙 1 2 3 4 5 6 7 8 9 10 11 12 13 14 15 16 17 18 int dragonBall = 7 ;new CountDownLatch(dragonBall);for (int i = 0 ; i < 7 ; i++) {new Thread(()->{"现在拿到了" + num + "号龙珠" );"龙珠集齐,召唤神龙" );
第二节 CyclicBarrier 支持多线程在执行各自任务的时候,到达某个状态点就等待,等所有线程都到达这个状态点再继续执行后步骤。
1 2 3 4 5 6 7 8 9 10 11 12 13 14 15 16 17 18 19 20 21 22 23 24 25 26 27 28 29 30 31 32 33 34 35 36 37 38 39 40 41 42 43 44 45 46 47 48 49 50 51 52 53 54 55 56 57 58 59 60 61 62 63 64 65 66 67 68 69 70 71 72 public class O19CyclicBarrierTest private static List<List<String>> matrix = new ArrayList<>();static {"normal" ,"special" ,"end" ));"normal" ,"normal" ,"special" ,"end" ));"normal" ,"normal" ,"normal" ,"special" ,"end" ));public static void main (String[] args) new CyclicBarrier(3 );new Thread(()->{try {0 );for (String value : list) {1 );" value = " + value);if ("special" .equals(value)) {catch (InterruptedException e) {catch (BrokenBarrierException e) {"thread01" ).start();new Thread(()->{try {1 );for (String value : list) {1 );" value = " + value);if ("special" .equals(value)) {catch (InterruptedException e) {catch (BrokenBarrierException e) {"thread02" ).start();new Thread(()->{try {2 );for (String value : list) {1 );" value = " + value);if ("special" .equals(value)) {catch (InterruptedException e) {catch (BrokenBarrierException e) {"thread03" ).start();
执行结果
thread02 value = normal
第三节 Semaphore 1、常规方式使用 使用 Semaphore 可以帮助我们管理资源位;当某个线程申请资源时,由 Semaphore 检查这个资源是否可用;如果其他线程释放了这个资源,那么申请资源的线程就可以使用。
1 2 3 4 5 6 7 8 9 10 11 12 13 14 15 16 17 18 19 20 21 22 new Semaphore(3 );for (int i = 0 ; i < 10 ; i++) {new Thread(() -> {try {"【" + Thread.currentThread().getName() + "】号车辆【驶入】车位" );3 );"【" + Thread.currentThread().getName() + "】号车辆【驶出】车位" );catch (InterruptedException e) {finally {"" ).start();
2、引入超时机制 1 2 3 4 5 6 7 8 9 10 11 12 13 14 15 16 17 18 19 20 21 22 23 24 25 26 27 28 29 30 31 32 33 34 35 36 37 38 39 int carPositionCount = 3 ;new Semaphore(carPositionCount);for (int i = 0 ; i < 50 ; i++) {int carNum = i;new Thread(()->{boolean acquireResult = false ;try {3 , TimeUnit.SECONDS);if (acquireResult) {"号车辆驶入车位" );2 );"号车辆驶出车位" );else {"号车辆放弃等待" );finally {if (acquireResult) {
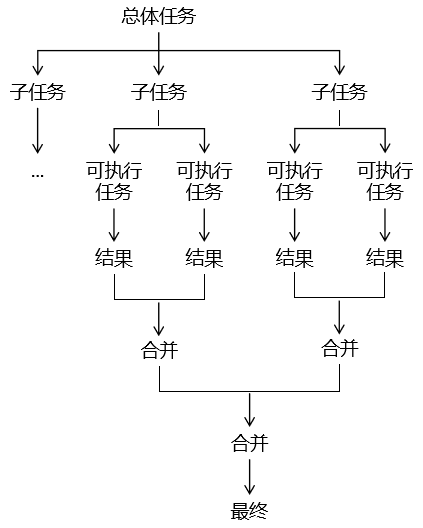
第四节 Fork Join 框架 1、介绍 使用 Fork Join 框架能够帮助我们把一个大型任务,根据一定规律,拆分成小任务执行。如果拆分后的任务还不够小,可以以递归 模式继续拆分,直到拆分到可以执行的程度。然后再把各个子任务执行的结果汇总到一起。
Fork:拆分:把大任务拆分成小任务。
Join:合并:把小任务执行的结果合并到一起。
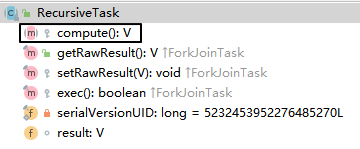
2、框架中 API 介绍 ①RecursiveTask
我们使用 Fork Join 框架只需要继承 RecursiveTask,然后重写 compute() 方法即可。在 compute() 方法中需要包含:
任务拆分的逻辑
任务拆分的操作:调用 fork() 方法
已拆分任务的合并:调用 join() 方法
子任务结果的合并:将 join() 方法的返回值合并起来
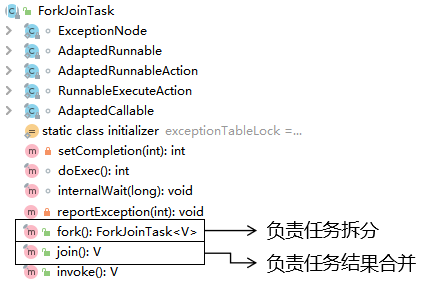
②ForkJoinTask ForkJoinTask 类是 RecursiveTask 的父类。
3、案例 ①需求 完成从 1~100 的累加。
②思路 通过任务拆分、合并的方式来实现。拆分的逻辑是:
将大范围数值累加拆分为小范围数值累加。
在 1~10 区间范围内执行计算。
③代码 [1]任务类 1 2 3 4 5 6 7 8 9 10 11 12 13 14 15 16 17 18 19 20 21 22 23 24 25 26 27 28 29 30 31 32 33 34 35 36 37 38 39 40 41 42 43 44 45 46 47 48 49 50 51 52 53 54 55 56 57 58 59 class MyTask extends RecursiveTask private int begin;private int end;public static final int ADJUST_VALUE = 10 ;private int result = 0 ;public MyTask (int begin, int end) this .begin = begin;this .end = end;@Override protected Object compute () if (end - begin <= ADJUST_VALUE) {for (int i = begin; i <= end ; i++) {else {int leftBegin = begin;int leftEnd = (begin + end) / 2 ;int rightBegin = leftEnd + 1 ;int rightEnd = end;new MyTask(leftBegin, leftEnd);new MyTask(rightBegin, rightEnd);int leftResult = (int ) myTaskLeft.join();int rightResult = (int ) myTaskRight.join();return result;
[2]测试代码 1 2 3 4 5 6 7 8 9 10 11 12 13 new ForkJoinPool();new MyTask(1 , 100 );int finalResult = (int ) forkJoinTask.get();"finalResult = " + finalResult);
第五节 CompletableFuture 1、简介 简单来说,CompletableFuture 就是 Callable + FutureTask 组合的『超级强化版 』。
FutureTask 的核心接口 Futrue 通常用来表示一个异步任务的引用,比如我们将任务提交到线程池里面,然后我们会得到一个 Futrue 对象。在 Future 里面有 isDone() 方法来判断任务是否处理结束,还有 get() 方法可以一直阻塞直到任务结束然后获取结果。但整体来说这种方式,还是同步 的,因为需要客户端不断阻塞等待或者不断轮询才能知道任务是否完成。
TIP
Future 的主要缺点如下:
我提交了一个任务,但是执行太慢了,我通过其他路径已经获取到了任务结果,现在没法把这个任务结果通知到正在执行的线程,所以必须主动取消或者一直等待它执行完成
通过Future的get方法会一直阻塞到任务完成,但是想在获取任务之后执行额外的任务,因为Future不支持回调函数,所以无法实现这个功能
对于 Future 的执行结果,我们想继续传到下一个 Future 处理使用,从而形成一个链式的 pipeline 调用,这在Future 中是没法实现的。
比如我们有 10 个 Future 并行执行,我们想在所有的Future运行完毕之后,执行某些函数,是没法通过 Future 实现的。
Future 的 API 没有任何的异常处理的 api,所以在异步运行时,如果出了问题是不好定位的。
2、用法
先调静态方法:既封装线程任务,又返回 CompletableFuture 对象。
通过 CompletableFuture 对象调用非静态方法:对任务进行进一步处理。
3、静态方法 ①无返回值的异步任务 方法名:runAsync()
封装任务的线程接口:Runnable 接口
1 2 3 4 5 6 7 8 9 10 11 12 13 14 15 " working" );"taskResult = " + taskResult);
②有返回值的异步任务 方法名:supplyAsync()
封装任务的线程接口:Supplier 接口
1 2 3 4 5 6 7 8 9 10 11 12 13 14 " working" );return "current thread compute result" ;"currentTaskComputeResult = " + currentTaskComputeResult);
TIP
链式调用是如何实现的?
一个方法希望实现链式调用,那么只需要让这个方法的返回值是可以调用下一个方法的对象即可;
静态方法:创建一个调用后面方法的对象,返回这个对象。
1 2 3 4 5 6 7 static <U> CompletableFuture<U> asyncSupplyStage (Executor e, Supplier<U> f) if (f == null ) throw new NullPointerException();new CompletableFuture<U>();new AsyncSupply<U>(d, f));return d;
1 2 3 4 5 6 7 8 9 public AbstractStringBuilder append (String str) if (str == null )return appendNull();int len = str.length();0 , len, value, count);return this ;
③同步多个任务 [1]allOf() 方法
调用 allOf 方法后返回一个 CompletableFuture 对象,调用这个对象的 get() 方法能够启动汇总的各个任务的线程
所有具体任务线程结束后,get() 方法结束阻塞,但是不返回任何结果。
如果需要各个具体任务各自的结果,那就调用各自的 get() 方法
1 2 3 4 5 6 7 8 9 10 11 12 13 14 15 16 17 18 19 20 21 22 23 24 25 26 27 28 29 30 31 32 33 34 35 36 37 38 39 40 41 42 43 44 45 46 47 48 49 50 51 CompletableFuture<String> future01 = CompletableFuture.supplyAsync(() -> {"任务 1 开始" );try {1 );} catch (InterruptedException e) {}"任务 1 结束" );return "task01 result" ;"任务 2 开始" );try {2 );} catch (InterruptedException e) {}"任务 2 结束" );return "task02 result" ;"任务 3 开始" );try {3 );} catch (InterruptedException e) {}"任务 3 结束" );return "task03 result" ;"all of future 的 get() 方法开始" );"all of future 的 get() 方法结束" );"nullResult = " + nullResult);"task01Result = " + task01Result);"task02Result = " + task02Result);"task03Result = " + task03Result);
[2]anyOf() 方法
汇总各个具体任务
在各个具体任务中有任何一个返回,汇总得到的 future 对象的 get() 方法就会返回
而且返回的是当前完成的任务的返回值
其它没有完成的任务不再继续执行
如果想要其它任务的结果,需要调用其它任务的 get() 方法,此时没有完成的任务会继续执行
1 2 3 4 5 6 7 8 9 10 11 12 13 14 15 16 17 18 19 20 21 22 23 24 25 26 27 28 29 30 31 32 33 34 35 36 37 38 39 40 41 42 43 44 45 46 47 48 49 50 51 CompletableFuture<String> future01 = CompletableFuture.supplyAsync(() -> {"任务 1 开始" );try {1 );} catch (InterruptedException e) {}"任务 1 结束" );return "task01 result" ;"任务 2 开始" );try {2 );} catch (InterruptedException e) {}"任务 2 结束" );return "task02 result" ;"任务 3 开始" );try {3 );} catch (InterruptedException e) {}"任务 3 结束" );return "task03 result" ;"总的 get() 方法开始了" );"总的 get() 方法结束了" );"summaryResult = " + summaryResult);"task01Result = " + task01Result);"task02Result = " + task02Result);"task03Result = " + task03Result);
4、非静态方法 ①获取任务线程结果 get()
显式功能:获取任务线程执行的结果,对于没有返回值的线程会返回 null。
隐式功能:启动任务线程。如果只是封装了任务,但是没有调用 get() 方法,那么任务线程不会被启动。
特点:在线程内的任务还没有完成的时候,get() 方法会一直阻塞,直到任务完成。
②后续操作 thenRun() 在上一个任务之后,单纯的执行下一个任务。不涉及数据传递,也没有返回值。
1 2 3 4 5 6 7 8 9 10 11 12 Void finalResult = CompletableFuture.supplyAsync(() -> {"上一个任务 " + Thread.currentThread().getName());return "prev task result" ;"then run 执行当前任务 " + Thread.currentThread().getName());"finalResult = " + finalResult);
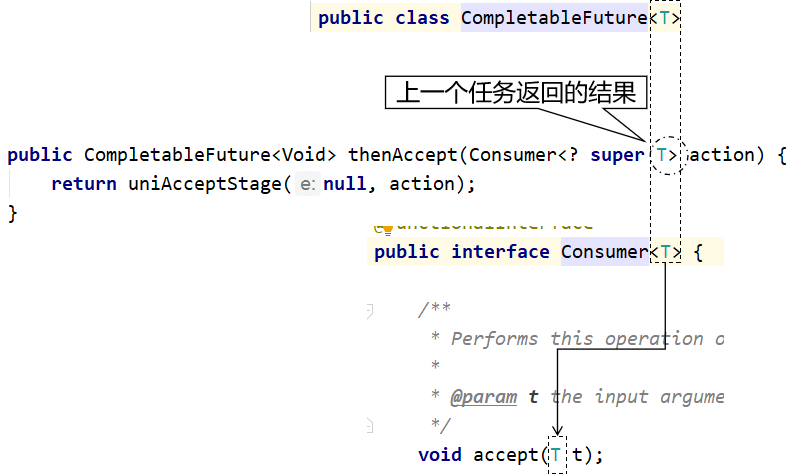
③消费处理结果 thenAccept() 能够接收上一个任务的结果,但是不返回新的结果。所涉及到的泛型类型分析如下:
1 2 3 4 5 6 7 CompletableFuture.supplyAsync(()->{return "prev task result" ;"prevTaskResult = " + prevTaskResult);
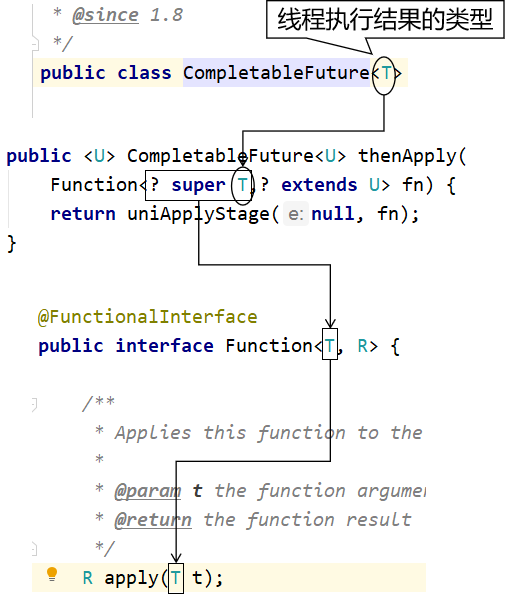
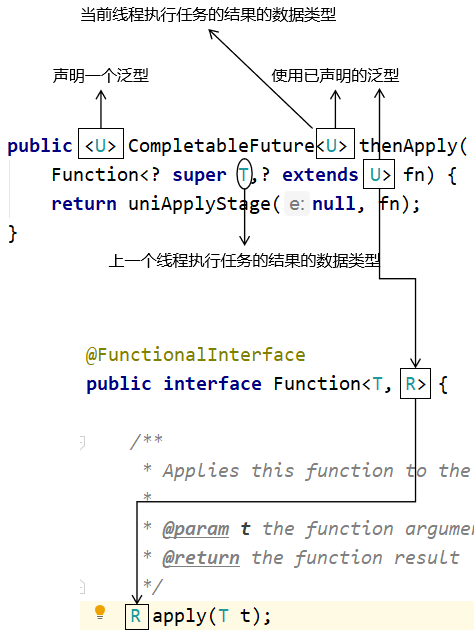
④线程依赖 thenApply() [1]Function 接口中泛型 T 的含义
[2]Function 接口中泛型 U 的含义
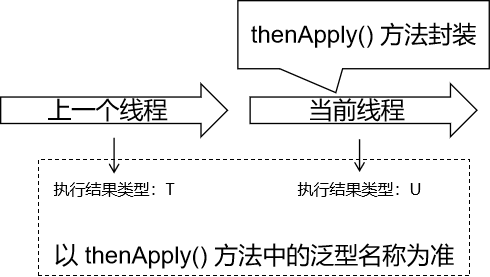
[3]thenApply() 方法的作用
[4]示例代码 1 2 3 4 5 6 7 8 9 10 11 12 13 14 15 16 Integer finalTaskResult = CompletableFuture.supplyAsync(() -> {" 上一个任务" );return "prev task result" ;"上一个任务的返回值:" + prevTaskResult);" 当前任务" );return new Integer(100 );"最终任务的返回值 = " + finalTaskResult);
[5]用法说明
调用 thenApply() 方法需要传入 java.util.function.Function<T,R> 类型的对象。
java.util.function.Function<T,R> 类型的对象可以通过 Lambda 表达式来创建。
泛型 T:上一个任务执行的结果的数据类型。
泛型 R:当前 thenApply() 方法封装的任务执行的结果的数据类型。
从 T 和 R 是两个不同类型可以看出:前一个任务和后一个任务可以返回不同数据类型的结果。
在 thenApply() 方法后面调用 get() 方法可以启动线程执行已封装的所有任务。
[6]扩展:thenApplyAsync() 方法
1 2 3 4 5 6 7 8 9 10 11 12 13 String finalResult = CompletableFuture.supplyAsync(() -> {" 上一个任务" );return "prev task result" ;" 当前任务" );return "current task result" ;"finalResult = " + finalResult);
ForkJoinPool.commonPool-worker-1 上一个任务 ForkJoinPool.commonPool-worker-1 当前任务 finalResult = current task result
说明:
thenApply():回到上一个任务所在线程的父线程执行;站在父线程的角度来看这里封装的新任务是在同一个线程(父线程)中执行的,所以算是同步的模式。
thenApplyAsync ():还在上一个任务所在的线程中执行;站在父线程的角度来看这里封装的新任务是在子线程中执行的,所以算是异步模式。
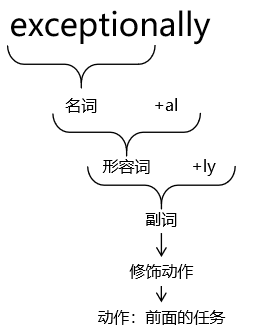
⑤异常处理 exceptionally()
作用:针对前面的所有任务,提供异常处理的功能。
特点:
能够接收前面任务执行过程中抛出的异常对象
能够在前面任务抛出异常后返回一个相同类型的备用结果,让上层程序可以继续执行(类似于 SpringCloud 中服务降级、熔断思想。)
1 2 3 4 5 6 7 8 9 10 11 12 13 14 15 16 17 18 19 20 21 22 23 24 25 String finalResult = CompletableFuture.supplyAsync(() -> {"第一个任务" );return "first task result" ;"第二个任务 " + (10 / 0 ));return prevTaskResult;"exceptionFullName = " + exceptionFullName);"cause.getClass().getName() = " + cause.getClass().getName());"message = " + message);return "前面任务抛出了异常,由 exceptionally() 方法提供一个备选任务结果。" ;"finalResult = " + finalResult);
⑥结果合并:thenCompose()
合并两个任务
合并的两个任务可以传递任务结果:将第一个任务的结果传给第二个任务
1 2 3 4 5 6 7 8 9 10 11 12 13 14 15 16 17 18 19 20 21 22 23 24 25 26 27 28 29 30 31 32 33 34 35 36 37 38 String finalResult = CompletableFuture.supplyAsync(() -> {return "first task result" ;return CompletableFuture.supplyAsync(() -> {"second task result" ;"@" + currentTaskResult;return composedTaskResult;return CompletableFuture.supplyAsync(() -> {"third task result" ;"@" + currentTaskResult;return composedTaskResult;"finalResult = " + finalResult);
⑦结果合并:thenCombine 作用:组合两个任务,这两个任务之间不传递数据。但是通过 BiFunction 接口类型的对象将两个任务的结果合并到一起。
1 2 3 4 5 6 7 8 9 10 11 12 13 14 15 16 17 18 19 20 21 22 23 CompletableFuture<String> future01 = CompletableFuture.supplyAsync(() -> {" 第一个任务。" );return "first task result" ;" 第二个任务。" );return "second task result" ;" @ " + secondTaskResult;return finalResult;"finalResult = " + finalResult);
两种合并方式对比:
⑧手动完成任务:complete() 作用:如果我们能够在负责具体任务的线程返回计算结果之前,能够在别的地方拿到任务结果,那么就可以调用 complete() 方法提前结束任务。
1 2 3 4 5 6 7 8 9 10 11 12 13 14 15 16 17 18 19 CompletableFuture<String> future = CompletableFuture.supplyAsync(() -> {try {10 );catch (InterruptedException e) {return "normal task result" ;try {3 );catch (InterruptedException e) {"special task result" );
⑨最后的处理:handle() 相当于在处理整个任务的过程中,在最后的环节做最后的处理。 如果前面的操作中有抛出异常,那么从 Throwable throwable 参数这里可以传进来 如果前面的操作没有抛异常,那么 Throwable throwable 参数传入的就是 null
1 2 3 4 5 6 7 8 9 10 11 12 13 14 15 16 17 18 19 20 21 String finalResult = CompletableFuture.supplyAsync(() -> {return "task result 0001" ;"在第二个任务中获取到的上一个任务的结果 = " + prevTaskResult);return "task result 0002" ;"handle 方法中获取到的上一个任务的结果 = " + prevTaskResult);"handle 方法中获取到的异常:throwable = " + throwable);return "current task result" ;"finalResult = " + finalResult);
5、典型应用 从其他渠道获取到计算结果后,get() 方法结束阻塞。
1 2 3 4 5 6 7 8 9 10 11 12 13 14 15 16 17 18 19 20 21 22 23 24 CompletableFuture<String> future = CompletableFuture.supplyAsync(()->{for (int i = 0 ; i < 20 ; i++) {" is working" );try {TimeUnit.SECONDS.sleep(1 );} catch (InterruptedException e) {}return "original result" ;new Thread(()->{try {TimeUnit.SECONDS.sleep(5 );} catch (InterruptedException e) {}boolean finishResult = future.complete("new result from another way" );"finishResult = " + finishResult);"finalResult = " + finalResult);
6、电商项目 异步编排的功能需要用到 CompletableFuture 这个类。