本文最后更新于:15 天前
使用 Lock API 控制多线程 第一节 HelloWorld 1、卖票 1 2 3 4 5 6 7 8 9 10 11 12 13 14 15 16 17 18 19 20 21 22 23 24 25 26 27 28 29 30 31 32 33 34 35 36 37 38 39 40 41 42 43 44 45 46 47 48 49 50 51 52 53 54 55 56 57 58 59 60 61 62 public class Demo01HelloWorld private int stock = 100 ;private Lock lock = new ReentrantLock();public void saleTicket () try {if (stock > 0 ) {" 卖了一张,还剩 " + --stock + " 张票。" );else {" 卖完了。" );catch (Exception e) {finally {public static void main (String[] args) new Demo01HelloWorld();new Thread(()->{for (int i = 0 ; i < 40 ; i++) {try {1 );} catch (InterruptedException e) {}"thread-01" ).start();new Thread(()->{for (int i = 0 ; i < 40 ; i++) {try {1 );} catch (InterruptedException e) {}"thread-02" ).start();new Thread(()->{for (int i = 0 ; i < 40 ; i++) {try {1 );} catch (InterruptedException e) {}"thread-03" ).start();
2、需要注意的点 ①确保锁被释放 使用 Lock API 实现同步操作,是一种面向对象的编码风格。这种风格有很大的灵活性,同时可以在常规操作的基础上附加更强大的功能。但是也要求编写代码更加谨慎:如果忘记调用 lock.unlock() 方法则锁不会被释放,从而造成程序运行出错。
②加锁和解锁操作对称执行 不管同步操作是一层还是多层,有多少个加锁操作,就应该相应的有多少个解锁操作。
③避免锁对象的线程私有化 锁对象如果是线程内部自己创建的,而且是自己独占的,其它线程访问不到这个对象,那么这个锁将无法实现『排他』 效果,说白了就是:锁不住。
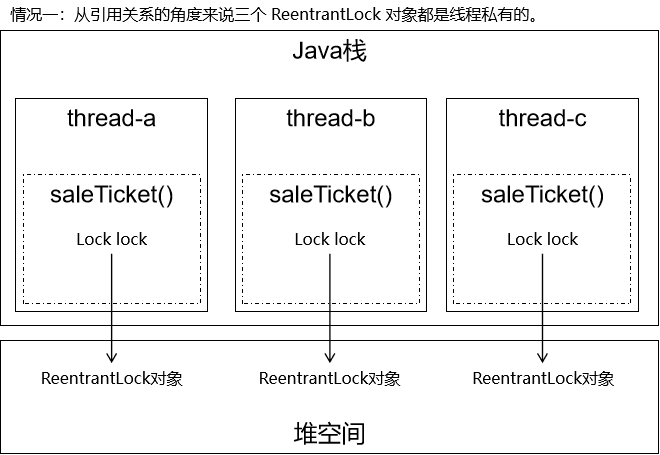
[1]情况一局部变量:线程私有 代码片段如下:
1 2 3 4 5 6 public void saleTicket () new ReentrantLock();
内存分析如下:
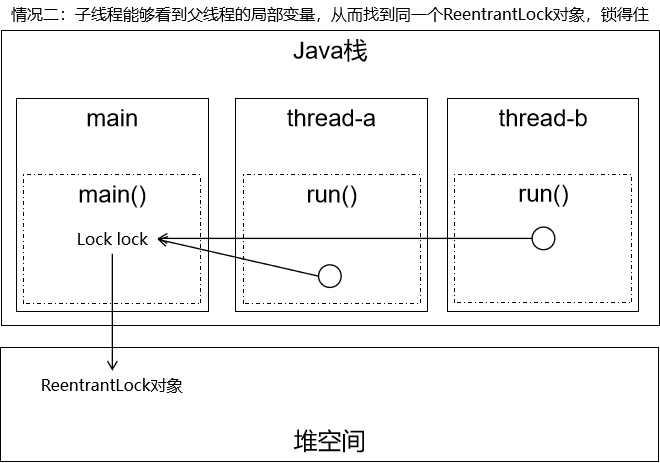
[2]情况二局部变量:线程共享 代码片段如下:
1 2 3 4 5 6 7 8 9 10 11 12 13 14 15 public static void main (String[] args) new ReentrantLock();new Thread(()->{"thread-a" ).start();new Thread(()->{"thread-b" ).start();
内存分析如下:
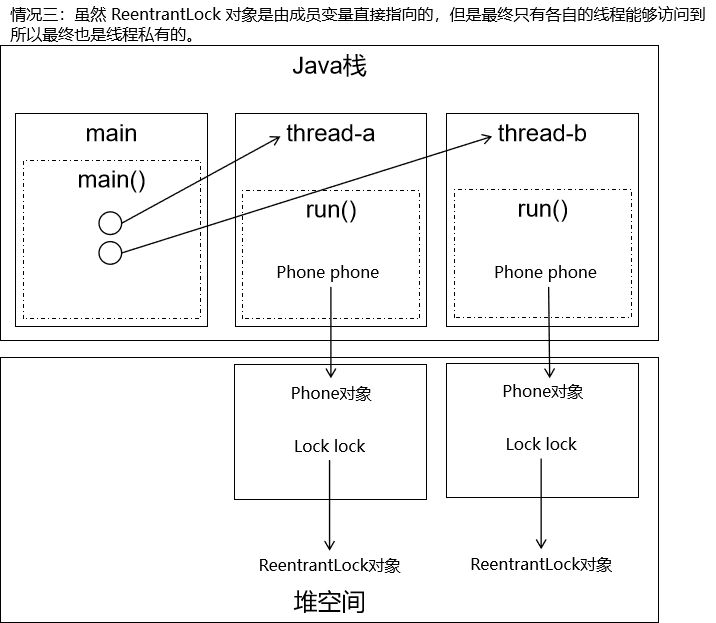
[3]情况三成员变量:线程私有 代码片段如下:
1 2 3 4 5 6 7 8 9 10 11 12 13 14 15 16 17 18 19 20 21 class Phone private Lock lock = new ReentrantLock();public void sendShortMessage () public static void main (String[] args) new Thread(()->{new Phone();"thread-a" ).start();new Thread(()->{new Phone();"thread-a" ).start();
内存分析如下:
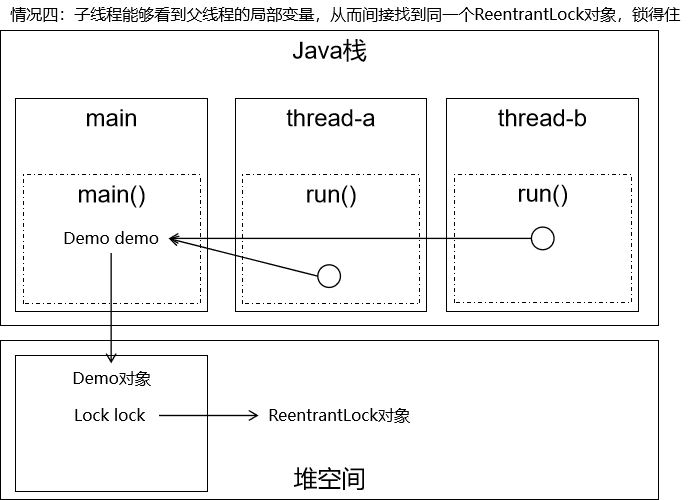
[4]情况四成员变量:线程共享 代码片段如下:
1 2 3 4 5 6 7 public class Demo01HelloWorld private int stock = 100 ;private Lock lock = new ReentrantLock();
1 2 3 4 public static void main (String[] args) new Demo01HelloWorld();
内存分析如下:
[5]小结
使用 Lock 对象实现同步锁,要求各个线程使用的是同一个对象。
那么各个线程它们使用的是不是同一个 ReentrantLock 对象,不能看表面。
表面现象1:使用局部变量指向 ReentrantLock 对象。
表面现象2:使用成员变量指向 ReentrantLock 对象。
本质:根据一系列引用的链条最终找的的 ReentrantLock 对象是不是
堆空间中的同一个对象
第二节 Lock 接口 全类名:java.util.concurrent.locks.Lock
方法功能说明:
方法名
功能
void lock()
加同步锁
void unlock()
解除同步锁
boolean tryLock()
尝试获取锁 返回 true:表示获取成功 返回 false:表示获取失败
boolean tryLock(long time, TimeUnit unit)
尝试获取锁,且等待指定时间 返回 true:表示获取成功 返回 false:表示获取失败
void lockInterruptibly()
以『支持响应中断』的模式获取锁
Condition newCondition();
获取用于线程间通信的 Condition 对象
第三节 可重入锁 全类名:java.util.concurrent.locks.ReentrantLock
1、基本用法
基本要求1:将解锁操作放在 finally 块中,确保解锁操作能够被执行到。
基本要求2:加锁和解锁操作要对称。
1 2 3 4 5 6 7 8 9 10 try {catch (Exception e) {finally {
2、验证可重入性 1 2 3 4 5 6 7 8 9 10 11 12 13 14 15 16 17 18 19 20 21 22 23 24 25 26 27 28 29 30 31 32 33 34 35 36 public void saleTicket () try {if (stock > 0 ) {" 卖了一张,还剩 " + --stock + " 张票。" );this .showMessage();else {" 卖完了。" );catch (Exception e) {finally {public void showMessage () try {" is working" );catch (Exception e) {finally {
3、接口定义:tryLock() 1 2 3 4 5 6 7 8 9 10 11 12 13 14 15 16 17 18 19 20 21 22 23 24 25 26 27 28 29 30 31 32 33 34 35 36 37 38 39 40 41 42 43 44 45 46 47 48 49 50 51 52 53 54 55 56 57 58 59 60 61 62 63 64 65 66 67 68 69 70 public class Demo03TryLock private Lock lock = new ReentrantLock();public void showMessage () boolean lockResult = false ;try {if (lockResult) {try {1 );} catch (InterruptedException e) {}" 得到了锁,正在工作" );else {" 没有得到锁" );catch (Exception e){finally {if (lockResult) {public static void main (String[] args) new Demo03TryLock();new Thread(()->{for (int i = 0 ; i < 20 ; i++) {try {TimeUnit.SECONDS.sleep(1 );} catch (InterruptedException e) {}"thread-01" ).start();new Thread(()->{for (int i = 0 ; i < 20 ; i++) {try {TimeUnit.SECONDS.sleep(1 );} catch (InterruptedException e) {}"thread-02" ).start();new Thread(()->{for (int i = 0 ; i < 20 ; i++) {try {TimeUnit.SECONDS.sleep(1 );} catch (InterruptedException e) {}"thread-03" ).start();
4、接口定义:tryLock(time, timeUnit) 1 2 3 4 5 6 7 8 9 10 11 12 13 14 15 16 17 18 19 20 21 22 23 24 25 26 27 28 29 30 31 32 33 34 35 36 37 38 39 40 41 42 43 44 45 46 47 48 49 50 51 52 53 54 55 56 57 58 59 60 public class Demo04TryLockWithTime private Lock lock = new ReentrantLock();public void useLock () try {" 开始工作" );try {TimeUnit.SECONDS.sleep(5 );} catch (InterruptedException e) {}" 结束工作" );catch (Exception e) {finally {public void waitLock () boolean lockResult = false ;try {3 , TimeUnit.SECONDS);if (lockResult) {" 得到了锁,开始工作" );else {" 没有得到锁" );catch (Exception e){finally {if (lockResult) {public static void main (String[] args) new Demo04TryLockWithTime();new Thread(()->{"thread-a" ).start();new Thread(()->{"thread-b" ).start();
5、实现类提供:公平锁 ①概念 在 ReentrantLock 构造器中传入 boolean 类型的参数:
true:创建公平锁(在锁上等待最长时间的线程有最高优先级)
false:创建非公平锁
1 2 3 public ReentrantLock (boolean fair) new FairSync() : new NonfairSync();
②代码 1 2 3 4 5 6 7 8 9 10 11 12 13 14 15 16 17 18 19 20 21 22 23 24 25 26 27 28 29 30 31 32 33 34 35 36 37 38 39 40 41 42 43 44 45 46 47 48 49 50 51 52 53 54 55 56 public class Demo05FairLock private Lock lock = new ReentrantLock(true );public void printMessage () try {" say hello to you" );try {TimeUnit.SECONDS.sleep(1 );} catch (InterruptedException e) {}catch (Exception e) {finally {public static void main (String[] args) new Demo05FairLock();new Thread(()->{for (int i = 0 ; i < 10 ; i++) {"thread-a" ).start();new Thread(()->{for (int i = 0 ; i < 10 ; i++) {"thread-b" ).start();new Thread(()->{for (int i = 0 ; i < 10 ; i++) {"thread-c" ).start();
③使用建议
公平锁对线程操作的吞吐量有限制,效率上不如非公平锁。
如果没有特殊需要还是建议使用默认的非公平锁。
6、接口定义:lockInterruptibly() TIP
lock:动词,加锁的动作
Interruptibly:修饰动词的副词,表示可以被打断
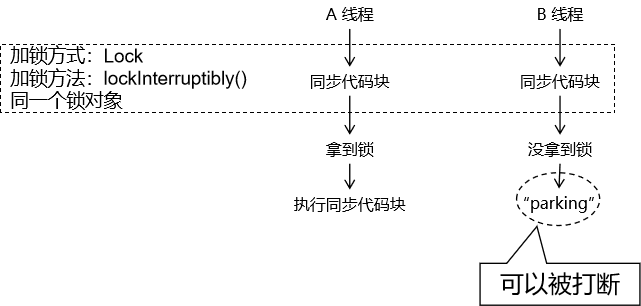
组合起来的含义:以可以被打断的方式加锁。具体来说就是如果线程是被 lockInterruptibly() 加的锁给阻塞的,那么这个阻塞状态可以被打断。
①响应中断 响应中断这个概念,我们这么解释:
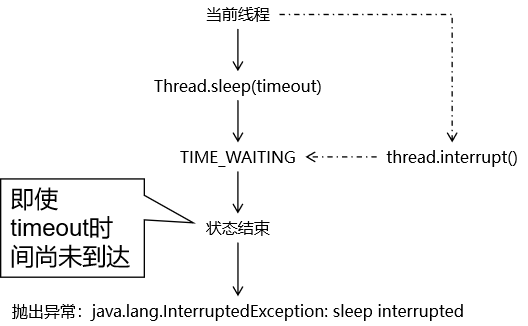
下图描述的是一个最基本的响应中断状态:
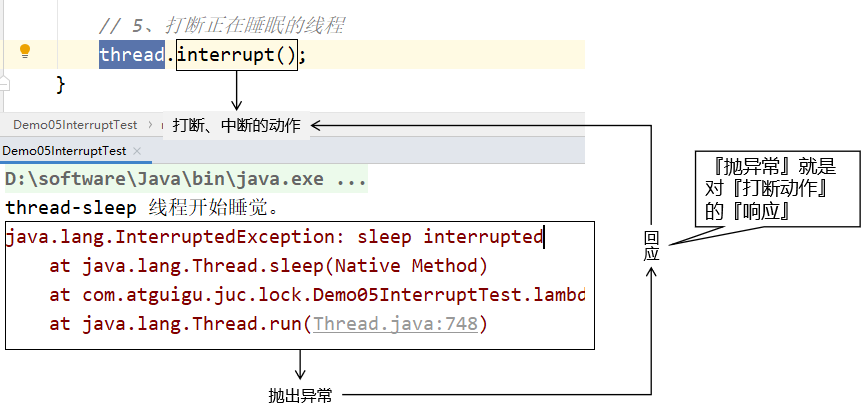
默认情况下,对于调用了 sleep() 方法进入 TIME_WAITING 状态的线程,可以通过调用 interrupt() 方法打断。对此我们可以说:线程的 TIME_WAITING 状态支持响应中断。
1 2 3 4 5 6 7 8 9 10 11 12 13 14 15 16 17 18 19 20 21 22 23 24 25 26 27 public static void main (String[] args) new Thread(() -> {try {" 开始睡了" );20000 );" 睡醒了" );catch (InterruptedException e) {try {TimeUnit.SECONDS.sleep(5 );} catch (InterruptedException e) {}
线程被打断后会抛出异常:
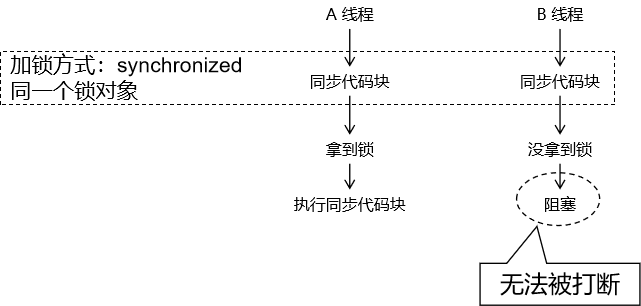
②synchronized 方式下的阻塞状态无法被打断 结论:synchronized 导致的 blocked 状态不支持响应中断。
1 2 3 4 5 6 7 8 9 10 11 12 13 14 15 16 17 18 19 20 21 22 23 24 25 26 27 28 29 30 31 32 33 34 35 public static void main (String[] args) new Object();new Thread(()->{synchronized (lock) {while (true ) {}"thread-a" ).start();try {TimeUnit.SECONDS.sleep(1 );} catch (InterruptedException e) {}new Thread(() -> {" 开始痴痴的等待锁 。。。" );synchronized (lock) {"thread-b" );try {TimeUnit.SECONDS.sleep(3 );} catch (InterruptedException e) {}"调用 thread.interrupt() 方法之前" );"调用 thread.interrupt() 方法之后" );
点击快照可以看到 thread-a处于RUNNABLE状态,thread-b 一直处于CLOCKED阻塞状态
③lockInterruptibly()
lockInterruptibly() 方法表示获取锁但是没有得到的时候,在阻塞中等待其它线程释放锁的过程中,可以被打断。
1 2 3 4 5 6 7 8 9 10 11 12 13 14 15 16 17 18 19 20 21 22 23 24 25 26 27 28 29 30 31 32 33 34 35 36 37 38 39 40 41 42 43 44 45 46 47 48 49 50 51 52 53 54 public class Demo07LockInterruptibly private Lock lock = new ReentrantLock();public void useLock () try {while (true ) {" 正在占用锁" );try {TimeUnit.SECONDS.sleep(1 );} catch (InterruptedException e) {}finally {public void waitLock () " 线程启动了" );try {finally {" 线程结束了" );public static void main (String[] args) new Demo07LockInterruptibly();new Thread(()->{"thread-qiang" ).start();new Thread(() -> {"thread-ming" );try {TimeUnit.SECONDS.sleep(3 );} catch (InterruptedException e) {}
第四节 读写锁 1、读写锁介绍 ①概念 在实际场景中,读操作不会改变数据,所以应该允许多个线程同时读取共享资源;但是如果一个线程想去写这些共享资源,就不应该允许其他线程对该资源进行读和写的操作了。
针对这种场景,Java 的并发包提供了读写锁 ReentrantReadWriteLock ,它表示两个锁,一个是读 操作相关的锁,称为读锁 ,这是一种共享锁 ;一个是写 相关的锁,称为写锁 ,这是一种排他锁 ,也叫独占锁 、互斥锁 。
②进入条件 [1]进入读锁的条件
同一个线程内(可重入性角度):
目前无锁:可以进入
已经有读锁:可以进入
已经有写锁:可以进入(锁可以降级,权限可以收缩)
不同线程之间(排他性角度):
其他线程已经加了读锁:可以进入
其他线程已经加了写锁:不能进入
[2]进入写锁的条件
同一个线程内(可重入性角度):
目前无锁:可以进入
已经有读锁:不能进入(锁不能升级,权限不拿扩大) 已经有写锁:可以进入
不同线程之间(排他性角度):
其他线程已经加了读锁:不能进入 其他线程已经加了写锁:不能进入
③重要特性 [1]公平选择性 支持非公平(默认)和公平的锁获取方式,吞吐量还是非公平优于公平。
[2]重进入 读锁和写锁都支持线程重进入:
同一个线程:加读锁后再加读锁
同一个线程:加写锁后再加写锁
[3]锁降级 在同一个线程内:读锁不能升级为写锁,但是写锁可以降级为读锁。
2、ReadWriteLock 接口 全类名:java.util.concurrent.locks.ReadWriteLock
源码如下:
1 2 3 4 5 6 7 8 9 10 11 12 13 14 15 public interface ReadWriteLock Lock readLock () ;Lock writeLock () ;
readLock() 方法用来获取读锁,writeLock() 方法用来获取写锁。也就是说将文件的读写操作分开,分成两种不同的锁来分配给线程,从而使得多个线程可以同时进行读操作。
该接口下我们常用的实现类是:java.util.concurrent.locks.ReentrantReadWriteLock
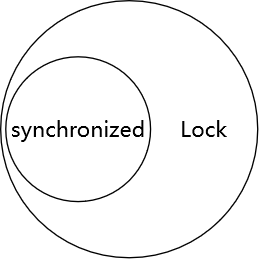
3、ReentrantReadWriteLock 和 Lock 的关系
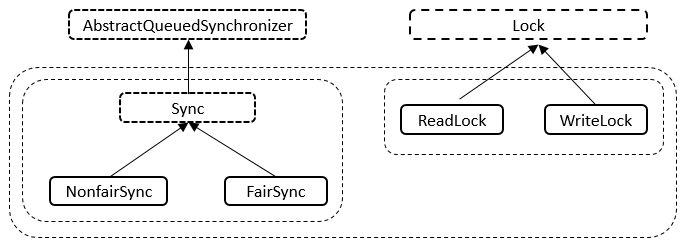
4、ReentrantReadWriteLock 类的整体结构 1 2 3 4 5 6 7 8 9 10 11 12 13 14 15 16 17 18 19 20 21 22 23 24 25 26 27 28 29 30 31 32 33 34 35 36 37 38 public class ReentrantReadWriteLock implements ReadWriteLock , java .io .Serializable private final ReentrantReadWriteLock.ReadLock readerLock;private final ReentrantReadWriteLock.WriteLock writerLock;final Sync sync;public ReentrantReadWriteLock () this (false );public ReentrantReadWriteLock (boolean fair) new FairSync() : new NonfairSync();new ReadLock(this );new WriteLock(this );public ReentrantReadWriteLock.WriteLock writeLock () { return writerLock; }public ReentrantReadWriteLock.ReadLock readLock () { return readerLock; }abstract static class Sync extends AbstractQueuedSynchronizer static final class NonfairSync extends Sync static final class FairSync extends Sync public static class ReadLock implements Lock , java .io .Serializable public static class WriteLock implements Lock , java .io .Serializable
ReentrantReadWriteLock 中有五个内部类,五个内部类之间也是相互关联的。内部类的关系如下图所示。
Sync 继承自 AQS
NonfairSync 和 FairSync 是 Sync 类的子类
ReadLock 和 WriteLock 实现了Lock接口
总体结构图:
5、效果对比 ①情景设定 多个线程对同一个数据执行读操作。
②synchronized 方式 [1]测试代码 1 2 3 4 5 6 7 8 9 10 11 12 13 14 15 16 17 18 19 public synchronized void readOperation () for (int i = 0 ; i < 5 ; i++) {try {1 );} catch (InterruptedException e) {}" is reading" );public static void main (String[] args) new ReadWriteLockDemo01();for (int i = 0 ; i < 5 ; i++) {new Thread(()->{"thread" + i).start();
[2]执行效果 每个线程都必须拿到锁才可以执行:
thread0 is reading0 is reading0 is reading0 is reading0 is reading4 is reading4 is reading4 is reading4 is reading4 is reading3 is reading3 is reading3 is reading3 is reading3 is reading2 is reading2 is reading2 is reading2 is reading2 is reading1 is reading1 is reading1 is reading1 is reading1 is reading
③ReentrantReadWriteLock 方式 [1]测试代码 1 2 3 4 5 6 7 8 9 10 11 12 13 14 15 16 17 18 19 20 21 22 23 24 25 26 27 private ReentrantReadWriteLock lock = new ReentrantReadWriteLock();private ReentrantReadWriteLock.ReadLock readLock = lock.readLock();public void readOperation () try {for (int i = 0 ; i < 5 ; i++) {1 );" is reading" );catch (InterruptedException e) {finally {public static void main (String[] args) new ReadWriteLockDemo01();for (int i = 0 ; i < 5 ; i++) {new Thread(() -> {"thread" + i).start();
[2]执行效果 读锁允许各个线程交替执行,大大提升了效率:
thread0 is reading thread2 is reading thread3 is reading thread4 is reading thread1 is reading thread2 is reading thread1 is reading thread4 is reading
……
TIP
注意:
如果有一个线程已经占用了读锁,则此时其他线程如果要申请写锁,则申请写锁的线程会一直等待释放读锁。
如果有一个线程已经占用了写锁,则此时其他线程如果申请写锁或者读锁,则申请的线程会一直等待释放写锁。
6、典型案例 ①情景设定 使用 ReentrantReadWriteLock 进行读和写操作
操作
测试目标
场景一
多个线程同时获取读锁
读锁可以共享
场景二
多线程获取写锁
写锁不能共享
场景三
一个线程先获取读锁后其他线程获取写锁
读排斥写
场景四
一个线程获取写锁后其他线程获取读锁
写排斥读
场景五
同一个线程获取读锁后再去获取写锁
读权限不能升级为写权限
场景六
同一个线程获取写锁后再去获取读锁
写权限可以降级为读权限
场景七
同一个线程获取读锁之后再去获取读锁
读锁可重入
场景八
同一个线程获取写锁之后再去所获写锁
写锁可重入
场景九
同一个线程获取写锁之后再去获取读锁再继续获取写锁
写锁里面读写都可获取
①场景一:『读』可共享 结论: 多个线程可以同时获取读锁
[1]功能代码 1 2 3 4 5 6 7 8 9 10 11 12 13 14 15 16 17 18 19 20 21 22 23 class Situation01 private ReentrantReadWriteLock lock = new ReentrantReadWriteLock();private ReentrantReadWriteLock.ReadLock readLock = lock.readLock();public void read () try {" 开始执行读操作" );try { TimeUnit.SECONDS.sleep(1 );} catch (InterruptedException e) {}" 结束执行读操作" );finally {
[2]测试代码 1 2 3 4 5 6 7 8 new Situation01();for (int i = 0 ; i < 10 ; i++) {new Thread(()->{"thread" + i).start();
[3]打印效果
thread0 开始执行读操作
②场景二:『写』互排斥 结论:多个线程同时获取写锁,同一时间只有一个线程 能获取到写 锁
[1]功能代码 1 2 3 4 5 6 7 8 9 10 11 12 13 14 15 16 17 18 19 20 21 22 23 24 25 26 class Situation02 private ReentrantReadWriteLock lock = new ReentrantReadWriteLock();private ReentrantReadWriteLock.WriteLock writeLock = lock.writeLock();public void write () try {" 开始执行写操作" );try {TimeUnit.SECONDS.sleep(1 );} catch (InterruptedException e) {}" 结束执行写操作" );catch (Exception e) {finally {
[2]测试代码 1 2 3 4 5 6 7 8 new Situation02();for (int i = 0 ; i < 10 ; i++) {new Thread(()->{
[3]打印效果
Thread-0 开始执行写操作
Thread-1 开始执行写操作
Thread-2 开始执行写操作
Thread-3 开始执行写操作
③场景三:『读』排斥『写』 结论:当对象具有读 锁时,其他线程无法加上写 锁
[1]功能代码 1 2 3 4 5 6 7 8 9 10 11 12 13 14 15 16 17 18 19 20 21 22 23 24 25 26 27 28 29 30 31 32 33 34 35 36 37 38 39 40 41 42 43 44 45 46 47 48 49 50 51 52 53 54 class Situation03 private ReentrantReadWriteLock lock = new ReentrantReadWriteLock();private ReentrantReadWriteLock.ReadLock readLock = lock.readLock();private ReentrantReadWriteLock.WriteLock writeLock = lock.writeLock();public void read () try {" 开始执行读操作" );5 );" 结束执行读操作" );catch (Exception e) {finally {public void write () try {" 开始执行写操作" );1 );" 结束执行写操作" );catch (Exception e) {finally {
[2]测试代码 1 2 3 4 5 6 7 8 9 10 11 12 new Situation03();new Thread(()->{"thread-read" ).start();new Thread(()->{ situation03.write(); }, "thread-write 01" ).start();new Thread(()->{ situation03.write(); }, "thread-write 02" ).start();new Thread(()->{ situation03.write(); }, "thread-write 03" ).start();
[3]打印效果
thread-read 开始执行读操作
thread-write 02 开始执行写操作
thread-write 03 开始执行写操作
④场景四:『写』排斥『读』 结论:当对象具有写 锁时,其他线程无法加上读 锁
[1]功能代码 1 2 3 4 5 6 7 8 9 10 11 12 13 14 15 16 17 18 19 20 21 22 23 24 25 26 27 28 29 30 31 32 33 34 35 36 37 38 39 40 41 42 43 44 45 46 47 48 49 50 51 52 53 class Situation04 private ReentrantReadWriteLock lock = new ReentrantReadWriteLock();private ReentrantReadWriteLock.ReadLock readLock = lock.readLock();private ReentrantReadWriteLock.WriteLock writeLock = lock.writeLock();public void read () try {" 开始执行读操作" );1 );" 结束执行读操作" );catch (Exception e) {finally {public void write () try {" 开始执行写操作" );5 );" 结束执行写操作" );catch (Exception e) {finally {
[2]测试代码 1 2 3 4 5 6 7 8 9 Situation04 situation04 = new Situation04();new Thread(()->{ situation04.write(); }, "thread-write" ).start();new Thread(()->{ situation04.read(); }, "thread-read 01" ).start();new Thread(()->{ situation04.read(); }, "thread-read 02" ).start();new Thread(()->{ situation04.read(); }, "thread-read 03" ).start();
[3]打印效果
thread-write 开始执行写操作
thread-read 01 开始执行读操作
⑤场景五:『锁升级』不允许 结论:同一个线程中如果读锁尚未释放就不允许获取写锁,这说明读锁不能升级为写锁 。
[1]功能代码 1 2 3 4 5 6 7 8 9 10 11 12 13 14 15 16 17 18 19 20 21 22 23 24 25 26 27 28 29 class Situation05 private ReentrantReadWriteLock lock = new ReentrantReadWriteLock();private ReentrantReadWriteLock.ReadLock readLock = lock.readLock();private ReentrantReadWriteLock.WriteLock writeLock = lock.writeLock();public void readThenWrite () try {" 正在读取数据" );" 正在写入数据" );catch (Exception e) {finally {
[2]测试代码 1 2 3 4 Situation05 situation05 = new Situation05();new Thread(()->{ situation05.readThenWrite(); }).start();
[3]打印效果
Thread-0 正在读取数据
⑥场景六:『锁降级』 结论:同一个线程,拥有写锁后,即使写锁尚未释放也仍可再获取读锁,这说明写锁可以降级为读锁 。
[1]功能代码 1 2 3 4 5 6 7 8 9 10 11 12 13 14 15 16 17 18 19 20 21 22 23 24 25 26 27 28 29 30 31 32 class Situation06 private ReentrantReadWriteLock lock = new ReentrantReadWriteLock();private ReentrantReadWriteLock.ReadLock readLock = lock.readLock();private ReentrantReadWriteLock.WriteLock writeLock = lock.writeLock();public void writeThenRead () try {" 正在写入数据" );" 正在读取数据" );catch (Exception e) {finally {" 读锁释放" );" 写锁释放" );
[2]测试代码 1 2 3 4 Situation06 situation06 = new Situation06();new Thread(()->{ situation06.writeThenRead(); }).start();
[3]打印效果
Thread-0 正在写入数据
⑦场景七:『读锁可重入』 结论:同一个线程内,在读锁尚未释放时,再加读锁——可以。
[1]功能代码 1 2 3 4 5 6 7 8 9 10 11 12 13 14 15 16 17 18 19 20 21 22 23 24 25 26 27 28 29 30 31 32 33 34 35 class Situation07 private ReadWriteLock readWriteLock = new ReentrantReadWriteLock();private Lock readLock = readWriteLock.readLock();public void readThenRead () try {" 开始第一次读取数据" );" 开始第二次读取数据" );catch (Exception e) {finally {" 读锁释放" );" 读锁释放" );
[2]测试代码 1 2 3 Situation07 situation07 = new Situation07();new Thread(()->{ situation07.readThenRead(); }).start();
[3]打印效果
Thread-0 开始第一次读取数据
⑧场景八:『写锁可重入』 结论:同一个线程内,在写锁尚未释放时,再加写锁——可以。
[1]功能代码 1 2 3 4 5 6 7 8 9 10 11 12 13 14 15 16 17 18 19 20 21 22 23 24 25 26 27 28 29 30 31 32 33 34 35 class Situation08 private ReadWriteLock readWriteLock = new ReentrantReadWriteLock();private Lock writeLock = readWriteLock.writeLock();public void writeThenWrite () try {" 开始第一次写入数据" );" 开始第二次写入数据" );catch (Exception e) {finally {" 写锁释放" );" 写锁释放" );
[2]测试代码 1 2 3 Situation08 situation08 = new Situation08();new Thread(()->{ situation08.writeThenWrite(); }).start();
[3]打印效果
Thread-0 开始第一次写入数据
⑨场景九『写读写三重入』 在一个写锁里面加读锁,再在读锁里面加写锁。
结论:同一个线程内,在写锁尚未释放时,读写锁都可以加。
[1]功能代码 1 2 3 4 5 6 7 8 9 10 11 12 13 14 15 16 17 18 19 20 21 22 23 24 25 26 27 28 29 30 31 32 33 34 private ReadWriteLock readWriteLock = new ReentrantReadWriteLock();private Lock writeLock = readWriteLock.writeLock();private Lock readLock = readWriteLock.readLock();public void WriteReadWrite () try {"加了写锁" );try {"加了内层读锁" );try {"加了内内层写锁" );finally {"释放了内内层写锁" );finally {"释放内层读锁" );finally {"释放写锁" );
[2]测试代码 1 2 3 4 public static void main (String[] args) new Demo09WtireReadWrite();
[3]打印效果
加了写锁
第五节 线程间通信 1、核心语法
2、案例演示 ①题目要求 两个线程分别对一个 int 类型的数据执行 + 1 和 - 1 的操作,要求严格交替执行。
②代码实现 1 2 3 4 5 6 7 8 9 10 11 12 13 14 15 16 17 18 19 20 21 22 23 24 25 26 27 28 29 30 31 32 33 34 35 36 37 38 39 40 41 42 43 44 45 46 47 48 49 50 51 52 53 54 55 56 57 58 59 60 61 62 63 64 65 66 67 68 69 70 71 72 73 74 75 76 77 78 79 80 81 82 83 84 85 86 87 88 89 90 91 92 93 94 95 96 97 98 99 public class Demo03LockConditionWay private Lock lock = new ReentrantLock();private Condition condition = lock.newCondition();private int data = 0 ;public void doIncr () try {while (data == 1 ) {" 执行 + 1 操作,data = " + ++data);finally {public void doDecr () try {while (data == 0 ) {" 执行 - 1 操作,data = " + --data);catch (InterruptedException e) {finally {public static void main (String[] args) new Demo03LockConditionWay();new Thread(() -> {for (int i = 0 ; i < 20 ; i++) {"thread-add A" ).start();new Thread(() -> {for (int i = 0 ; i < 20 ; i++) {"thread-sub A" ).start();new Thread(() -> {for (int i = 0 ; i < 20 ; i++) {"thread-add B" ).start();new Thread(() -> {for (int i = 0 ; i < 20 ; i++) {"thread-sub B" ).start();
执行效果:
thread-add A 执行 + 1 操作,data = 1
3、定制化通信 传统的 synchronized、wait()、notifyAll() 方式无法唤醒一个指定的线程。而 Lock 配合 Condition 的方式能够唤醒指定的线程,从而执行指定线程中指定的任务。
①语法基础
②案例 [1]题目要求 要求四个线程交替执行打印如下内容:
线程1:打印连续数字
线程2:打印连续字母
线程3:打印 * 符
线程4:打印 $ 符
[2]代码实现 1 2 3 4 5 6 7 8 9 10 11 12 13 14 15 16 17 18 19 20 21 22 23 24 25 26 27 28 29 30 31 32 33 34 35 36 37 38 39 40 41 42 43 44 45 46 47 48 49 50 51 52 53 54 55 56 57 58 59 60 61 62 63 64 65 66 67 68 69 70 71 72 73 74 75 76 77 78 79 80 81 82 83 84 85 86 87 88 89 90 91 92 93 94 95 96 97 98 99 100 101 102 103 104 105 106 107 108 109 110 111 112 113 114 115 116 117 118 119 120 121 122 123 124 125 126 127 128 129 130 131 132 133 134 135 136 137 138 139 140 141 142 143 144 public class Demo03Condition private int step = 1 ;private int digital = 1 ;private char alphaBet = 'a' ;private Lock lock = new ReentrantLock();private Condition conditionDigital = lock.newCondition();private Condition conditionAlphaBet = lock.newCondition();private Condition conditionStar = lock.newCondition();private Condition conditionDollar = lock.newCondition();public void printDigital () try {while (step % 4 != 1 ) {catch (Exception e) {finally {public void printAlphaBet () try {while (step % 4 != 2 ) {catch (Exception e) {finally {public void printStar () try {while (step % 4 != 3 ) {"*" );catch (Exception e) {finally {public void printDollar () try {while (step % 4 != 0 ) {"$" );catch (Exception e) {finally {public static void main (String[] args) new Demo03Condition();new Thread(()->{for (int i = 0 ; i < 10 ; i++) {new Thread(()->{for (int i = 0 ; i < 10 ; i++) {new Thread(()->{for (int i = 0 ; i < 10 ; i++) {new Thread(()->{for (int i = 0 ; i < 10 ; i++) {
打印效果:
1a*$
③思考题 曾经有这样一道笔试题:一个线程打印连续数字,一个线程打印连续字母。要求打印两个数字,然后打印两个字母,如此往复。
12ab34cd56ef78gh ……
1 2 3 4 5 6 7 8 9 10 11 12 13 14 15 16 17 18 19 20 21 22 23 24 25 26 27 28 29 30 31 32 33 34 35 36 37 38 39 40 41 42 43 44 45 46 47 48 49 50 51 52 53 54 55 56 57 58 59 60 61 62 63 64 public class ThinkingThread private Lock lock = new ReentrantLock();private Condition conditionA = lock.newCondition();private Condition conditionB = lock.newCondition();private char alphabet = 'a' ;private int digital = 1 ;private int steep = 1 ;public void printDigital () new Thread(()->{while (true ){try {if (steep %2 != 1 ){if (digital > 25 ) digital = 1 ;catch (InterruptedException e) {finally {public void printAlphabet () new Thread(()->{while (true ){try {if (steep %2 != 0 ){if (alphabet > 'a' +25 ) alphabet = 'a' ;catch (InterruptedException e) {finally {public static void main (String[] args) new ThinkingThread();
第六节 Lock 与 synchronized 对比 1、相同点
2、不同点
Lock 系列 API 用法
synchronized 用法
加锁/解锁
手动
自动
支持共享锁
√
×
支持尝试获取锁失败
√
×
灵活
√
×
便捷
×
√
响应中断
lockInterruptibly() 方式支持阻塞状态响应中断
sleep() 睡眠后支持响应中断
代码风格
面向对象
面向过程
底层机制
AQS(volatile + CAS + 线程的双向链表)= 非阻塞同步
阻塞同步
3、使用建议 ①从功能效果的角度来看 Lock 能够覆盖 synchronized 的功能,而且功能更强大。
②从开发便捷性的角度来看
synchronized:自动加锁、解锁,使用方便
Lock:手动加锁、解锁,使用不那么方便
③从性能角度 二者差不多。
④使用建议 synchronized 够用,那就使用 synchronized;如果需要额外附加功能则使用 Lock:
公平锁
共享锁
尝试获取锁
以支持响应中断的方式获取锁
……
