本文最后更新于:16 天前
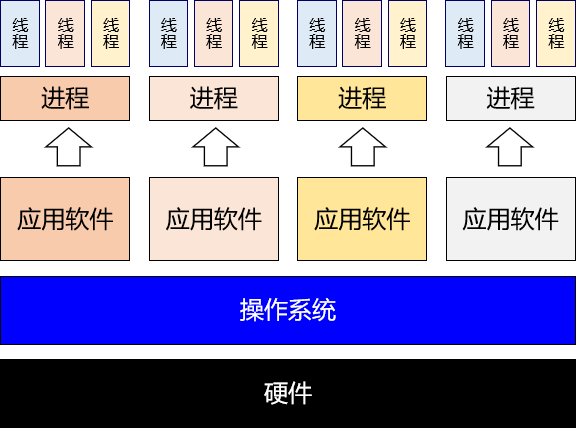
多线程知识 第一节 基础概念 1、程序、进程、线程 ①程序 程序从开发到发布的过程:源程序(源代码) → 打包封装 → 应用软件
笼统的来说,源程序、应用软件都可以称之为『程序』。
相对于进程、线程来说,程序是一个静态 的概念。
②进程
在一个进程中,需要同时处理多个不同任务,每一个任务由一个线程来执行。从这个意义上来说,我们可以把进程看做是线程的容器 。
2、串行、并行、并发 ①串行 多个操作在同一个线程内按顺序 执行。这种情况下的工作模式我们往往也称之为:同步 。按照同步模式执行的多个操作,当前操作没有结束时,下一个操作就必须等待。处于等待中的状态往往也称为:阻塞 (block)。
②并行、并发 并行和并发都是以异步 的模式来执行操作的。异步工作模式下不同线程内的操作互相不需要等待。
并行:多个 CPU(或 CPU 核心)同时执行多个任务
并发:一个 CPU(或 CPU 核心)同时执行多个任务
3、sleep() 和 wait() 区别 二者最关键的区别是下面两点:
sleep() 会让线程拿着锁 去睡
wait() 会让线程放开锁 去睡
①sleep() 进入等待状态不释放锁 1 2 3 4 5 6 7 8 9 10 11 12 13 14 15 16 17 18 19 20 21 22 23 24 25 26 27 28 29 30 31 32 33 public static void main (String[] args) new Object();new Thread(() -> {" begin" );synchronized (commonObject) {try {" get lock" );3000 ); " end" );catch (InterruptedException e) {" release lock" );"Thread-A" ).start();new Thread(() -> {" is begin" );synchronized (commonObject) {" get lock" );" is end" );" release lock" );"Thread-B" ).start();
打印结果:
Thread-A begin
②wait() 进入等待状态释放锁 1 2 3 4 5 6 7 8 9 10 11 12 13 14 15 16 17 18 19 20 21 22 23 24 25 26 27 28 29 30 31 32 33 public static void main (String[] args) new Object();new Thread(() -> {" begin" );synchronized (commonObject) {try {" get lock" );3000 ); " end" );catch (InterruptedException e) {" release lock" );"Thread-A" ).start();new Thread(() -> {" is begin" );synchronized (commonObject) {" get lock" );" is end" );" release lock" );"Thread-B" ).start();
打印结果:
Thread-A begin
③小结
wait()
sleep()
声明位置
Object 类
Thread 类
作用对象
作用于调用 wait() 方法的对象
作用于当前线程
性质
非静态方法
静态方法
释放锁资源
放开锁进入等待 不释放锁进入等待
同步要求
必须在同步上下文中使用
不要求在同步上下文中
应用场景
用于线程中通信
用来让线程暂停一段时间
4、同步方法和同步代码块 ①区别
锁对象
锁定范围
同步代码块
由程序员指定
代码块的范围(灵活)
同步方法
静态:类.class 非静态:this
整个方法体
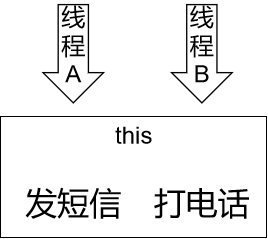
②同步方法锁对象案例 [1]第一种情况
1 2 3 4 5 6 7 8 9 10 11 12 13 14 15 16 17 18 19 20 21 22 23 24 25 26 27 28 29 30 31 32 33 34 35 36 37 38 public class Demo04SynchMethod public static void situation01 (String[] args) new Phone();new Thread(()->{"thread-a" ).start();try {TimeUnit.SECONDS.sleep(1 );} catch (InterruptedException e) {}new Thread(()->{"thread-b" ).start();class Phone public synchronized void sendShortMessage () " 发短信" );try { TimeUnit.SECONDS.sleep(5 );} catch (InterruptedException e) {}public synchronized void call () " 打电话" );
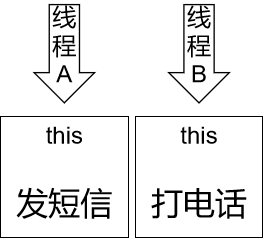
[2]第二种情况
1 2 3 4 5 6 7 8 9 10 11 12 13 14 15 16 17 new Phone();new Phone();new Thread(()->{"thread-a" ).start();try {TimeUnit.SECONDS.sleep(1 );} catch (InterruptedException e) {}new Thread(()->{"thread-b" ).start();
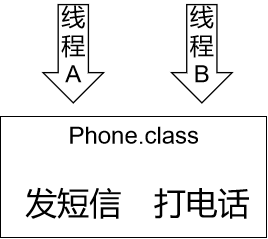
[3]第三种情况
1 2 3 4 5 6 7 8 9 10 11 12 13 14 15 16 17 18 19 20 21 22 23 24 25 26 27 28 29 30 31 32 33 34 35 36 37 38 39 40 public class Demo04SynchMethod public static void main (String[] args) new Thread(()->{"thread-a" ).start();try {TimeUnit.SECONDS.sleep(1 );} catch (InterruptedException e) {}new Thread(()->{"thread-b" ).start();class Phone public static synchronized void sendShortMessage () " 发短信" );try {" 开始睡觉" );5 );" 结束睡觉" );catch (InterruptedException e) {}public static synchronized void call () " 打电话" );
# [4]第四种情况
1 2 3 4 5 6 7 8 9 10 11 12 13 14 15 16 17 18 19 20 21 22 23 24 25 26 27 28 29 30 31 32 33 34 35 36 37 38 39 40 41 42 43 public class Demo04SynchMethod public static void main (String[] args) new Thread(()->{"thread-a" ).start();try {TimeUnit.SECONDS.sleep(2 );} catch (InterruptedException e) {}new Phone();new Thread(()->{"thread-b" ).start();class Phone public static synchronized void sendShortMessage () " 发短信" );try {" 开始睡觉" );5 );" 结束睡觉" );catch (InterruptedException e) {}public synchronized void call () " 打电话" );
# [5]结论
结论1:静态同步方法使用类.class作为锁对象;非静态同步方法使用this作为锁对象
结论2:多个线程如果使用同一个锁对象就会有竞争关系;否则没有竞争关系
5、练习:卖票的例子 1 2 3 4 5 6 7 8 9 10 11 12 13 14 15 16 17 18 19 20 21 22 23 24 25 26 27 28 29 30 31 32 33 34 35 36 37 38 39 40 41 42 43 44 45 public class Demo05SaleTicket private int stock = 10 ;public synchronized void saleTicket () if (stock > 0 ) {" 号窗口操作:还剩" + --stock + "张票," );else {"票卖完了!!!" );public static void main (String[] args) new Demo05SaleTicket();new Thread(()->{while (true ) {try {1 );} catch (InterruptedException e) {}"0001" ).start();new Thread(()->{while (true ) {try {1 );} catch (InterruptedException e) {}"0002" ).start();new Thread(()->{while (true ) {try {1 );} catch (InterruptedException e) {}"0003" ).start();
第二节 创建多线程 TIP
无论有多少种形式,创建多线程的真正的方法,其实只有两种:
继承 Thread 类
实现 Runnable 接口
其它形式都是这两种方式的变体。
1、继承 Thread 类 ①实现方式
第一步:继承 Thread 类
第二步:重写 run() 方法
第三步:创建 Thread 子类对象
第四步:调用 start() 方法启动线程
1 2 3 4 5 6 7 8 9 10 11 12 13 14 15 16 17 18 19 public class CreateThread01Extends public static void main (String[] args) new DemoThread("AAA" );class DemoThread extends Thread public DemoThread (String threadName) super (threadName);@Override public void run () " thread working ..." );
②start() 方法和 run() 方法区别 调用 run() 方法仅仅只是调用了一个子类中重写的父类方法,并没有真正开启一个新的线程,还是在当前线程运行,也就是 main 线程。
2、实现 Runnable 接口 ①实现 Runnable 接口形式 1 2 3 4 5 6 7 8 9 10 11 12 13 14 15 16 17 18 19 20 21 22 23 24 25 26 27 public class CreateThread02Impl public static void main (String[] args) new MyRunnableThread();new Thread(runnable, "thread 002" );class MyRunnableThread implements Runnable @Override public void run () " is working" );
②匿名内部类形式 1 2 3 4 5 6 7 8 9 10 11 12 13 14 15 16 new Runnable() {@Override public void run () " is working" );new Thread(runnable, "thread 003" );
③Lambda 表达式形式 [1]有声明变量的形式 1 2 3 4 5 6 7 8 9 10 11 12 13 14 15 16 17 18 " is working" );new Thread(runnable, "thread 004" );
[2]不声明变量形式 1 2 3 4 5 6 7 new Thread(() -> {" is working" );"thread 005" ).start();
3、使用 Callable 接口配合 FutureTask TIP
该方案最核心的价值是:使用 Callable 接口限定的功能 + Future 接口限定的功能 = 汇总 各个线程执行结果
最终执行汇总操作的这一步会被阻塞,直到前面各个线程完成了计算。
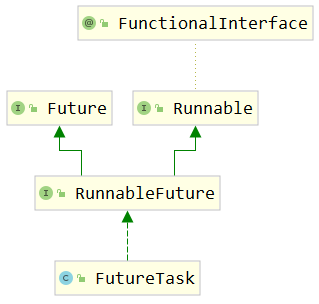
①FutureTask类和Runnable接口的关系
从继承关系能够看到,FutureTask本身也间接实现了Runnable接口。FutureTask类的对象也是Runnable接口的实例,可以用于在创建Thread对象时,传入Thread构造器。
②Future 接口 [1]停止任务 方法声明:
1 boolean cancel (boolean mayInterruptIfRunning)
如果尚未启动,它将停止任务。如果已启动,则仅在 mayInterrupt 为 true 时才会中断任务。
[2]获取任务的结果 1 V get () throws InterruptedException, ExecutionException ;
如果任务完成,它将立即返回结果,否则将等待任务完成,然后返回结果。
[3]判断任务是否完成 如果任务完成,则返回true,否则返回false。
③FutureTask 类的构造器 [1]介绍 FutureTask 类兼具 Runnable 和 Future 接口的功能,并方便地将两种功能组合在一起。关于 FutureTask 类的使用有如下建议:
在主线程中需要执行比较耗时的操作时,但又不想阻塞主线程时,可以把这些作业交给 Future 对象在后台完成
当主线程将来需要时,就可以通过 Future 对象获得后台作业的计算结果或者执行状态
一般 FutureTask 多用于耗时的计算,主线程可以在完成自己的任务后,再去获取结果。
仅在计算完成时才能检索结果;如果计算尚未完成,则阻塞 get() 方法
一旦计算完成,就不能再重新开始或取消计算
get() 方法而获取结果只有在计算完成时获取,否则会一直阻塞直到任务转入完成状态,然后会返回结果或者抛出异常
get() 只执行一次,因此get() 方法放到最后
[2]可以使用的构造器 1 2 3 4 5 6 public FutureTask (Callable<V> callable) if (callable == null )throw new NullPointerException();this .callable = callable;this .state = NEW;
根据这个构造器,我们知道,创建 FutureTask 对象时,传入一个 Callable 类型的对象即可。
④Callable 接口 1 2 3 4 5 6 7 8 9 10 @FunctionalInterface public interface Callable <V > V call () throws Exception ;
从 call() 方法的声明我们可以看出,它有一个返回值。这个返回值可以将当前线程内计算结果返回。
⑤测试代码 1 2 3 4 5 6 7 8 9 10 11 12 13 14 15 16 17 18 19 20 21 22 23 24 25 26 27 28 29 30 31 32 33 34 35 36 37 38 39 new FutureTask<>(() -> {int result = (int ) (Math.random() * Math.random() * 100 );return result;new FutureTask<>(() -> {int result = (int ) (Math.random() * Math.random() * 1000 );return result;new FutureTask<>(() -> {int result = (int ) (Math.random() * Math.random() * 10000 );return result;new Thread(task01, "thread01" ).start();new Thread(task02, "thread02" ).start();new Thread(task03, "thread03" ).start();"task01Result = " + task01Result);"task02Result = " + task02Result);"task03Result = " + task03Result);
⑥Callable和Runnable对比
Runnable接口
Callable接口
重写run()方法
重写call()方法
run()没有返回值
call()有返回值
run()没有声明抛出异常
call()声明抛出Exception
没有汇总各个线程结果的机制
有汇总各个线程结果的机制
⑦Callable接口方案的特点
该方案仅在计算完成时才能检索结果;如果计算尚未完成,则阻塞 get() 方法。一旦计算完成,就不能再重新开始或取消计算。get() 方法而获取结果只有在计算完成时获取,否则会一直阻塞直到任务转入完成状态,然后会返回结果或者抛出异常, 且只计算一次。
4、线程池 ①参考代码 1 2 3 4 5 6 7 8 9 10 11 12 13 14 15 5 );" " + new Date());" " + new Date());" " + new Date());
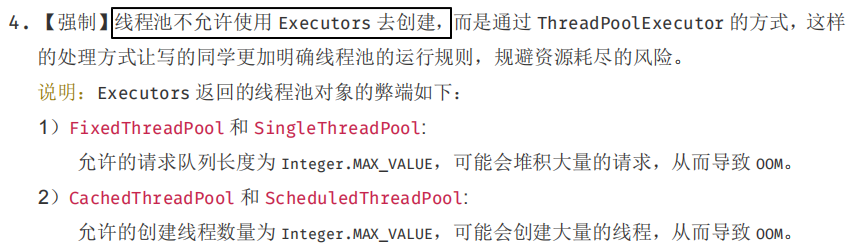
②开发建议 阿里开发手册中对线程创建的规定:
结论:实际开发中,建议使用『自定义线程池』 的方式创建多线程。
5、并行计算[了解] 1 2 3 4 5 6 7 8 List<String> list = Arrays.asList("a" , "b" , "c" , "d" , "e" );
6、Timer 定时任务[了解] 1 2 3 4 5 6 7 8 9 10 11 12 13 14 15 16 17 18 19 20 21 22 23 new Timer();new TimerTask() {@Override public void run () " is working" );0 , 1000 );new Timer();new TimerTask() {@Override public void run () " is working" );0 , 1000 );
Timer-0 is working
7、Spring 异步方法[了解] TIP
使用场景:
在 Spring 环境下,如果组件 A(假设是 ControllerA)要调用组件 B(假设是 ServiceB)的多个方法,而且希望这些方法能够异步执行。
①准备 SpringBoot 环境 # [1]引入依赖1 2 3 4 5 6 7 <dependencies > <dependency > <groupId > org.springframework.boot</groupId > <artifactId > spring-boot-starter-web</artifactId > <version > 2.5.2</version > </dependency > </dependencies >
[2]创建主启动类 1 2 3 4 5 6 @SpringBootApplication public class Application public static void main (String[] args)
[3]创建 Service 1 2 3 4 5 6 7 @Service public class DemoService public void doSth () "Demo Service " + Thread.currentThread().getName());
[4]创建 Controller 1 2 3 4 5 6 7 8 9 10 11 12 13 14 15 16 17 18 19 20 @RestController public class DemoController @Autowired private DemoService demoService;@RequestMapping("/demo/test/async") public String callServiceMethod () return "success" ;
②使用异步方法 [1]开启异步功能 在主启动类使用 @EnableAsync 注解:
1 2 3 4 5 6 7 8 9 10 @EnableAsync @SpringBootApplication public class Application public static void main (String[] args)
[2]标记异步方法 在想要异步调用的方法上使用 @Async 注解:
1 2 3 4 5 6 7 8 9 10 @Service public class DemoService @Async public void doSth () "Demo Service " + Thread.currentThread().getName());
8、小结 面试中如果被问到:创建多线程有哪些方法,至少要能说上来前四种。后面三种是用来卷别人、吹牛的。
其实 Fork Join、CompletableFuture 也可以,后面会讲到。
[基本] 继承 Thread 类
[基本] 实现 Runnable 接口
[基本] 线程池
[基本] Callable + FutureTask
[内卷] CompletableFuture
[内卷] Fork Join
[内卷] 并行计算
[内卷] Timer 定时任务
[内卷] Spring 的异步方法调用
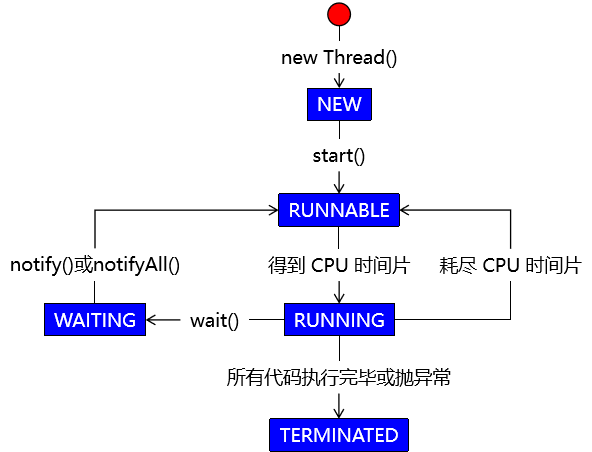
第三节 线程状态与生命周期 1、线程状态枚举类 ①源代码 在 java.lang.Thread 类中有一个内部类:
1 2 3 4 5 6 7 8 9 10 11 12 13 14 15 16 17 18 19 20 21 22 23 24 25 26 27 28 29 30 31 32 33 34 35 36 37 38 39 40 41 42 43 44 45 46 47 48 49 50 51 52 53 54 55 56 57 58 59 60 61 62 63 64 public enum State
②说明
英文名称
中文名称
含义
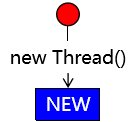
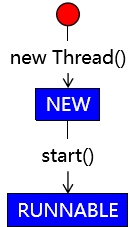
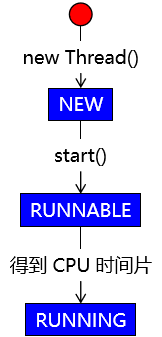
NEW
新建
线程对象刚创建
RUNNABLE
就绪
等待 CPU 时间片
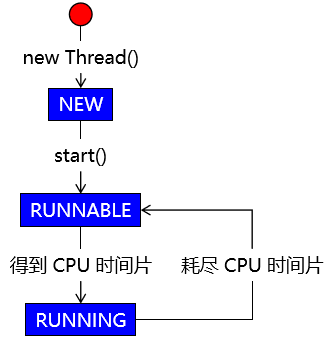
RUNNING
运行
得到了 CPU 时间片,正在执行
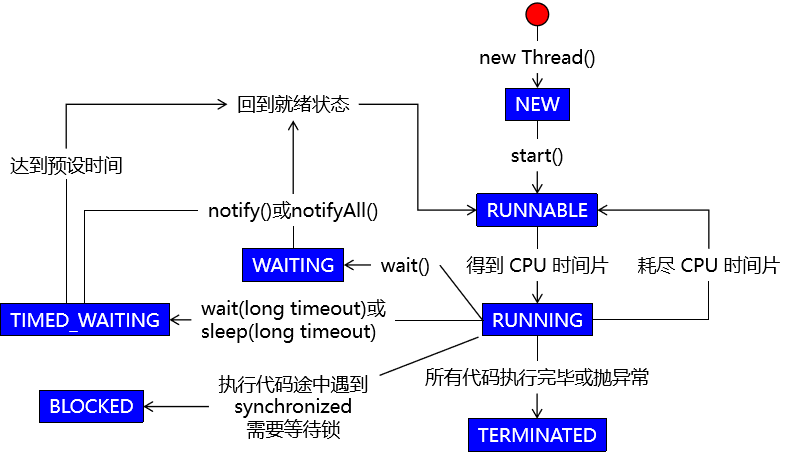
BLOCKED
阻塞
等待同步锁
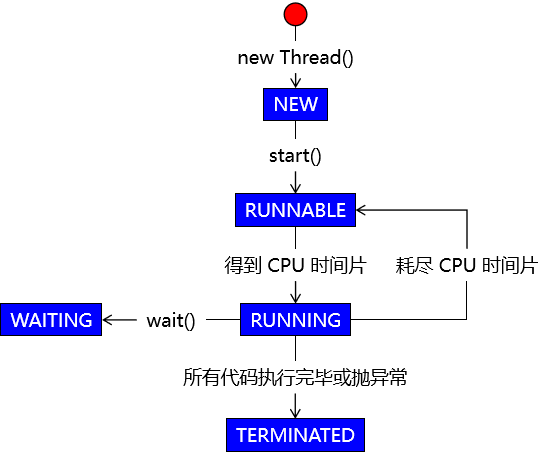
WAITING
等待
等待被唤醒
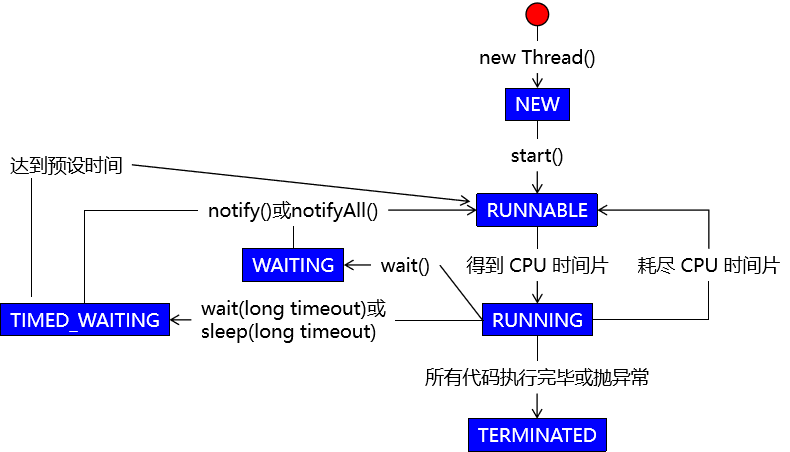
TIMED_WAITING
限时等待
在进入等待状态时设定了等待时间 时间一到自动回到就绪状态
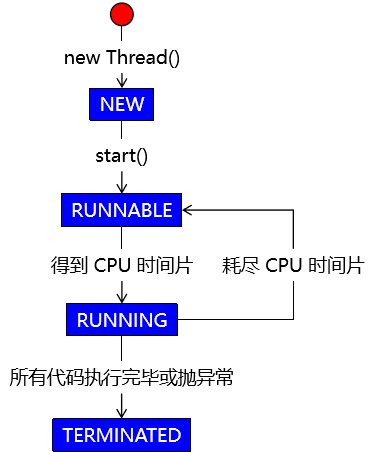
TERMINATED
终止
线程因为代码执行完成或抛异常而停止执行
TIP
WAITING:睡美人自己醒不过来,必须由王子来唤醒——体现到程序中是必须由其它线程唤醒。
TIMED_WAITING:上闹钟睡觉,闹钟一响就醒来——体现到程序中是过了超时时间就能被唤醒。
RUNNING:在 Thread.State 枚举类中并没有定义,是我们自己补充上去的。
2、线程的生命周期 ①新建
②就绪
③运行
④回到就绪状态 本次得到的 CPU 时间片用完,重新回到就绪状态,等待下一个 CPU 时间片。
⑤结束
⑥等待
⑦唤醒
WARNING
本土中的 notify()、notifyAll() 方法应该是由其它线程 调用,而不是当前线程自己。
⑧超时等待与唤醒
⑨阻塞
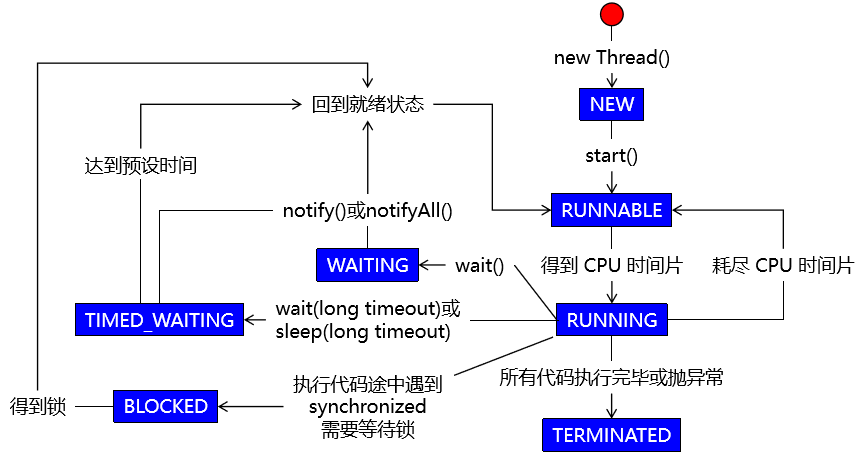
⑩得到锁
3、Dump Threads 学习目标:只是帮助大家理解,不做强制性要求。
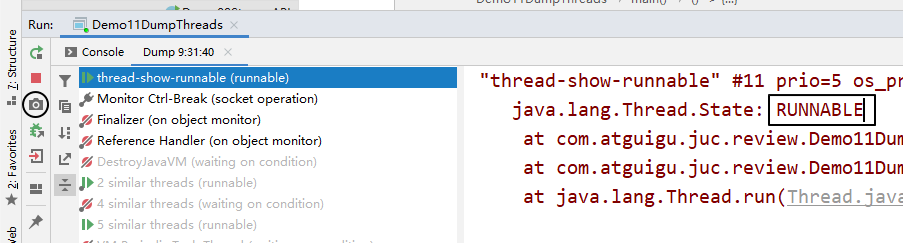
①演示就绪状态 [1]Java代码 1 2 3 new Thread(()->{while (true ){}"my-thread" ).start();
[2]查看线程状态
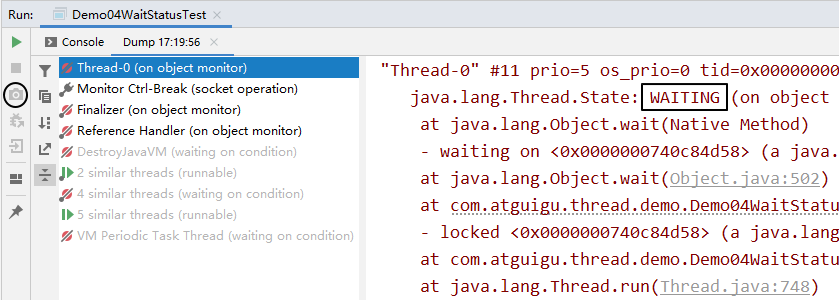
②演示等待状态 [1] Java代码 1 2 3 4 5 6 7 8 9 10 11 12 13 14 15 16 17 18 new Object();new Thread(()->{synchronized (commonObject) {try {catch (InterruptedException e) {
[2]查看线程状态
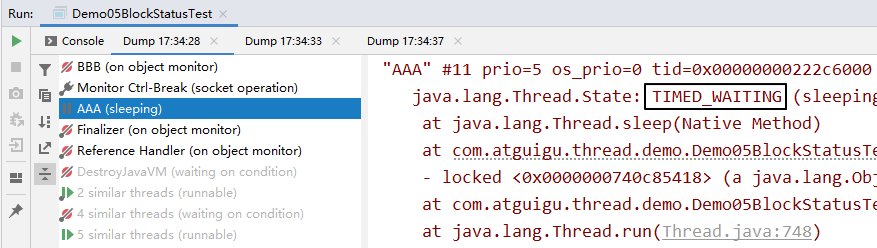
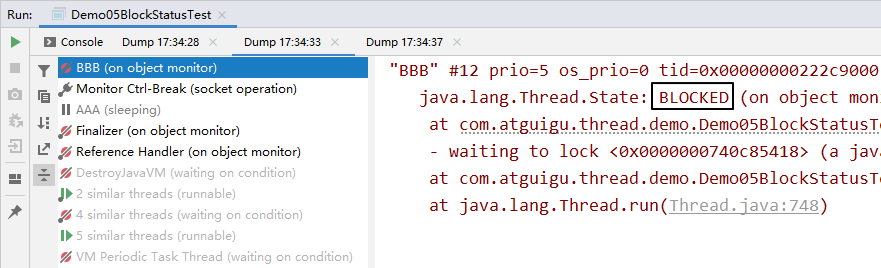
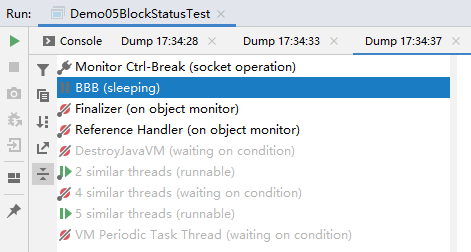
③演示阻塞状态 [1] Java代码 1 2 3 4 5 6 7 8 9 10 11 12 13 14 15 16 17 18 19 20 21 22 23 24 25 26 27 28 29 30 31 new Object();new Thread(()->{try {synchronized (commonObject) {10000 );catch (InterruptedException e) {"AAA" ).start();new Thread(()->{try {synchronized (commonObject) {10000 );catch (InterruptedException e) {"BBB" ).start();
[2]查看线程状态
状态一:AAA 线程获取同步锁,执行同步代码块,进入 TIMED_WAITING 状态。
状态二:AAA 线程未释放同步锁时,BBB 线程处于 BLOCKED 状态
状态三:AAA 线程执行完成,释放同步锁,BBB 线程获得同步锁,执行代码块,进入 TIMED_WAITING 状态。
第四节 线程间通信 TIP
在多线程模式下进行工作,除了要考虑各个线程之间是否同步、如何竞争锁等问题,还要考虑这样一个问题:线程之间有的时候需要相互配合 来共同完成一件事情。
把一个大的任务拆分成多个不同的任务线,每个任务线中都有更小的执行步骤。各个线程之间需要彼此配合:A 线程执行一步唤醒 B 线程,自己等待;B 线程执行一步,唤醒 A 线程,自己等待……
1、核心语法 ①Object 类的 wait() 方法 官方文档对 wait() 方法的说明(节选):
Causes the current thread to wait until another thread invokes the java.lang.Object#notify() method or the java.lang.Object#notifyAll() method for this object.
拆解要点:
wait() 方法会导致当前线程进入等待状态
必须是另外一个线程 调用 notify() 或 notifyAll() 方法来唤醒
“for this object” 表示还是要使用同一个对象 分别调用 wait()、notify()、notifyAll() 这些方法
②Object 类的 notify() 方法 官方文档对 notify() 方法的说明(节选):
Wakes up a single thread that is waiting on this object’s monitor. If any threads are waiting on this object, one of them is chosen to be awakened.
拆解要点:
notify() 方法只唤醒一个 线程
处于等待状态的线程会被存放在对象监视器中的一个数组中
如果在这个对象的监视器中维护的处于等待状态的线程是多个,那么 notify() 方法会随机唤醒一个
notfiy() 方法无法精确唤醒一个指定的线程 ,这个需求可以通过 Lock + Condition 方式实现(定制化通信)
③Object 类的 notifyAll() 方法 官方文档对 notifyAll() 方法的说明(节选):
Wakes up all threads that are waiting on this object’s monitor.
翻译:唤醒当前对象监视器上等待的所有线程 。
2、案例演示 ①需求说明
设定一个成员变量,作为两个线程都要操作的共享数据,设置初始化值为 0
A 线程执行 +1 操作
B 线程执行 -1 操作
A、B 两个线程交替执行
②实现代码 1 2 3 4 5 6 7 8 9 10 11 12 13 14 15 16 17 18 19 20 21 22 23 24 25 26 27 28 29 30 31 32 33 34 35 36 37 38 39 40 41 42 43 44 45 46 47 48 49 50 51 52 53 54 55 56 57 58 59 60 61 62 63 64 65 66 67 68 69 70 71 72 73 74 75 76 77 78 79 80 81 82 83 84 85 86 public class Demo01TwoThreads private int number = 0 ;public void add () synchronized (this ) {try {if (number > 0 ) {this .wait();" 线程:" + ++number);this .notifyAll();catch (InterruptedException e) {public void sub () synchronized (this ) {try {if (number <= 0 ) {this .wait();" 线程:" + --number);this .notifyAll();catch (InterruptedException e) {public static void main (String[] args) new Demo01TwoThreads();new Thread(()->{for (int i = 0 ; i < 50 ; i++) {try {1 );} catch (InterruptedException e) {}"thread-a" ).start();new Thread(()->{for (int i = 0 ; i < 50 ; i++) {try {1 );} catch (InterruptedException e) {}"thread-b" ).start();
TIP
测试多线程程序的基本逻辑:
代码的某些错误→运行结果部分正确
运行结果的一次错误→证明代码肯定有问题
结论:不能全看运行结果。
如果我们希望能够尽可能通过运行结果证明代码正确,那就需要增加运行的次数,或者有可能需要取消执行过程中的时间间隔。
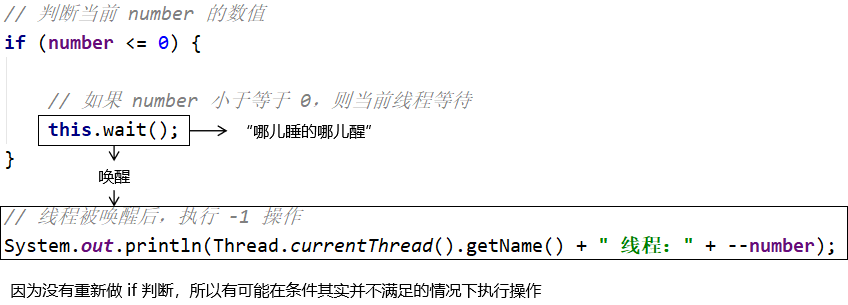
3、虚假唤醒 ①问题描述 当上面的例子中,线程数量从两个增加到四个,计算结果就会出错:
thread-a 线程:1 thread-c 线程:2 thread-a 线程:3 thread-d 线程:2 thread-d 线程:1 thread-d 线程:0 thread-b 线程:-1 thread-d 线程:-2 thread-a 线程:-1 thread-a 线程:0 thread-a 线程:1 thread-c 线程:2 thread-a 线程:3 thread-d 线程:2 thread-d 线程:1
②问题分析 [1]使用 if 的情况
这种情况,我们称之为:虚假唤醒 。
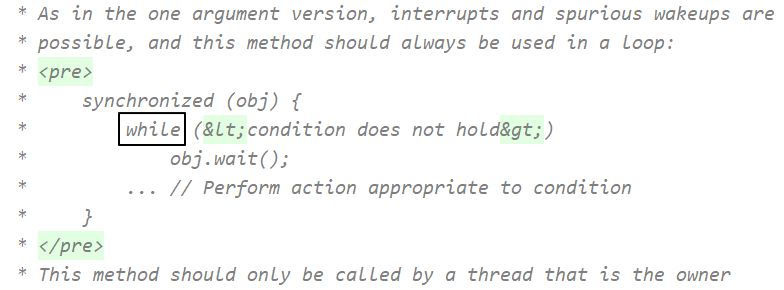
[2]使用 while 解决问题
③小结 要解决虚假唤醒问题,就需要对线程间通信时的判断条件使用 while 循环结构来执行,而不是 if 分支判断。