本文最后更新于:3 个月前
定时任务组件Quartz
Quart介绍
Quartz入门案例
spring整合Quartz(spring中配置)
cron表达式
cron表达式在线生成器
Quartz介绍 Quartz是Job scheduling(作业调度)领域的一个开源项目,Quartz既可以单独使用也可以跟spring框架整合使用,在实际开发中一般会使用后者。使用Quartz可以开发一个或者多个定时任务,每个定时任务可以单独指定执行的时间,例如每隔1小时执行一次、每个月第一天上午10点执行一次、每个月最后一天下午5点执行一次等。
官网:https://www.w3cschool.cn/quartz_doc/
简单来说,就是可以帮助我们设置一个有规律的或者在某个具体的时间点干点想干的事的一个开源框架。
在使用Scheduler之前,需要实例化 , scheduler实例化后,可以启动(start)、暂停(stand-by)、停止(shutdown)。
Quartz API的关键接口是:
Scheduler:任务调度器,所有的任务都是从这里开始。
Trigger:触发器,定义任务执行的方式、间隔。
JobDetail & Job : 定义任务具体执行的逻辑。
Scheduler的生命期,从SchedulerFactory创建它时开始,到Scheduler调用shutdown()方法时结束;Scheduler被创建后,可以增加、删除和列举Job和Trigger,以及执行其它与调度相关的操作(如暂停Trigger)。但是,Scheduler只有在调用start()方法后,才会真正地触发trigger(即执行job)
创建项目 quartz_demo 导入 maven 坐标:
1 2 3 4 5 6 7 8 9 10 11 12 13 <dependencies > <dependency > <groupId > org.quartz-scheduler</groupId > <artifactId > quartz</artifactId > <version > 2.2.1</version > </dependency > <dependency > <groupId > org.quartz-scheduler</groupId > <artifactId > quartz-jobs</artifactId > <version > 2.2.1</version > </dependency > </dependencies >
Quartz 入门案例
① 创建QuartzTest
1
2
3
4
5
6
7
8
9
10
11
12
13
14
15
16
17
18
19
20
21
22
23
24
25
26
27
28
29
30
31
32
33
34
35
36
37
38
39
40
41
42
43
44
45
46
47
48
49
50
51
52
53
54
55
56
57
package com.atguigu;import org.quartz.*;import org.quartz.impl.StdSchedulerFactory;public class QuarztTest public static void main (String[] args) try {"job1" , "group1" )"trigger1" , "group1" )3 )9000 );catch (SchedulerException | InterruptedException se) {
② 创建HelloQuartz
1
2
3
4
5
6
7
8
9
10
11
12
import org.quartz.Job;import org.quartz.JobDetail;import org.quartz.JobExecutionContext;import java.util.Date;public class HelloQuartz implements Job @Override public void execute (JobExecutionContext jobExecutionContext) throws JobExecutionException new Date());
1 2 3 4 5 6 <dependency > <groupId > org.springframework</groupId > <artifactId > spring-context-support</artifactId > <version > 5.0.2.RELEASE</version > </dependency >
Quartz整合springboot 创建项目 quartz_demo
添加pom文件
1 2 3 4 5 6 7 8 9 10 11 12 13 14 15 16 17 18 19 20 21 22 23 24 25 26 <parent > <groupId > org.springframework.boot</groupId > <artifactId > spring-boot-starter-parent</artifactId > <version > 2.1.6.RELEASE</version > <relativePath /> </parent > <dependencies > <dependency > <groupId > org.springframework.boot</groupId > <artifactId > spring-boot-starter-web</artifactId > </dependency > <dependency > <groupId > org.springframework.boot</groupId > <artifactId > spring-boot-starter-test</artifactId > <scope > test</scope > </dependency > <dependency > <groupId > org.springframework</groupId > <artifactId > spring-context-support</artifactId > <version > 5.0.5.RELEASE</version > </dependency > </dependencies >
创建 BootApplication
1
2
3
4
5
6
@SpringBootApplication @EnableScheduling public class BootApplication public static void main (String[] args)
创建 TaskController
1
2
3
4
5
6
7
8
9
10
11
12
13
14
15
16
17
18
19
20
21
22
23
24
25
26
27
28
29
30
31
32
33
34
35
36
37
38
39
40
41
42
43
44
45
46
47
48
49
50
51
52
package com.atguigu.controller;import java.text.SimpleDateFormat;import java.util.Date;import org.slf4j.Logger;import org.slf4j.LoggerFactory;import org.springframework.scheduling.annotation.Scheduled;import org.springframework.stereotype.Controller;@Controller("Task") public class TaskController @Scheduled(fixedDelay = 3000) public void myTask1 () new SimpleDateFormat("yyyy-MM-dd HH:mm:ss" );new Date()));try {3000 );catch (InterruptedException e) {@Scheduled(fixedRate = 3000) public void myTask2 () new SimpleDateFormat("yyyy-MM-dd HH:mm:ss" );new Date()));try {5000 );catch (InterruptedException e) {@Scheduled(cron = "0/5 * * * * ?") public void cronTask () {"Cron方式-定时任务执行时间:" + dateFormat.format(new Date()));
Quartz整合spring
创建maven工程quartzdemo,打包方式为war,导入jar包
自定义一个Job
提供Spring配置文件application-jobs.xml,配置自定义Job、任务描述、触发器、调度工厂等
web.xml中定义
启动tomcat完成测试
本案例基于Quartz和spring整合的方式使用。具体步骤:
(1)创建maven工程quartz_demo,打包方式为war,导入Quartz和spring相关坐标,pom.xml文件如下
导入jar包
1
2
3
4
5
6
7
8
9
10
11
12
13
14
15
16
17
18
19
20
21
22
23
24
25
26
27
28
29
30
31
32
33
34
35
36
37
38
39
40
41
42
43
44
45
46
47
48
49
50
51
52
53
54
<?xml version="1.0" encoding="UTF-8"?> <project xmlns ="http://maven.apache.org/POM/4.0.0" xmlns:xsi ="http://www.w3.org/2001/XMLSchema-instance" xsi:schemaLocation ="http://maven.apache.org/POM/4.0.0 http://maven.apache.org/xsd/maven-4.0.0.xsd" > <modelVersion > 4.0.0</modelVersion > <groupId > com.atguigu</groupId > <artifactId > quartz_demo</artifactId > <version > 1.0-SNAPSHOT</version > <packaging > war</packaging > <dependencies > <dependency > <groupId > org.springframework</groupId > <artifactId > spring-context-support</artifactId > <version > 5.0.2.RELEASE</version > </dependency > <dependency > <groupId > org.springframework</groupId > <artifactId > spring-tx</artifactId > <version > 5.0.2.RELEASE</version > </dependency > <dependency > <groupId > org.springframework</groupId > <artifactId > spring-web</artifactId > <version > 5.0.2.RELEASE</version > </dependency > <dependency > <groupId > org.quartz-scheduler</groupId > <artifactId > quartz</artifactId > <version > 2.2.1</version > </dependency > <dependency > <groupId > org.quartz-scheduler</groupId > <artifactId > quartz-jobs</artifactId > <version > 2.2.1</version > </dependency > </dependencies > <build > <plugins > <plugin > <groupId > org.apache.tomcat.maven</groupId > <artifactId > tomcat7-maven-plugin</artifactId > <configuration > <port > 8080</port > <path > /</path > </configuration > </plugin > </plugins > </build > </project >
(2)自定义一个Job
1 2 3 4 5 6 7 public class JobDemo public void excute () "执行任务" + new Date());
(3)提供Spring配置文件application-jobs.xml,配置自定义Job、任务描述、触发器、调度工厂等
创建JobDetail对象,作用是负责通过反射调用指定的Job,注入目标对象,注入目标方法
注册一个触发器,指定任务触发的时间
注册一个统一的调度工厂,通过这个调度工厂调度任务
1
2
3
4
5
6
7
8
9
10
11
12
13
14
15
16
17
18
19
20
21
22
23
24
25
26
27
28
29
30
31
32
33
34
35
36
37
<?xml version="1.0" encoding="UTF-8"?> <beans xmlns ="http://www.springframework.org/schema/beans" xmlns:xsi ="http://www.w3.org/2001/XMLSchema-instance" xmlns:context ="http://www.springframework.org/schema/context" xsi:schemaLocation ="http://www.springframework.org/schema/beans http://www.springframework.org/schema/beans/spring-beans.xsd http://www.springframework.org/schema/context http://www.springframework.org/schema/context/spring-context.xsd" ><bean id ="jobDemo" class ="com.atguigu.JobDemo" > </bean > <bean id ="jobDetail" class ="org.springframework.scheduling.quartz.MethodInvokingJobDetailFactoryBean" > <property name ="targetObject" ref ="jobDemo" /> <property name ="targetMethod" value ="run" /> </bean > <bean id ="myTrigger" class ="org.springframework.scheduling.quartz.CronTriggerFactoryBean" > <property name ="jobDetail" ref ="jobDetail" /> <property name ="cronExpression" > <value > 0/10 * * * * ?</value > </property > </bean > <bean id ="scheduler" class ="org.springframework.scheduling.quartz.SchedulerFactoryBean" > <property name ="triggers" > <list > <ref bean ="myTrigger" /> </list > </property > </bean > </beans >
(4)web.xml中定义
1
2
3
4
5
6
7
8
9
10
11
12
13
14
<?xml version="1.0" encoding="UTF-8"?> <web-app xmlns:xsi ="http://www.w3.org/2001/XMLSchema-instance" xmlns ="http://java.sun.com/xml/ns/javaee" xsi:schemaLocation ="http://java.sun.com/xml/ns/javaee http://java.sun.com/xml/ns/javaee/web-app_3_0.xsd" id ="WebApp_ID" version ="3.0" > <listener > <listener-class > org.springframework.web.context.ContextLoaderListener</listener-class > </listener > <context-param > <param-name > contextConfigLocation</param-name > <param-value > classpath:application-jobs.xml</param-value > </context-param > </web-app >
启动tomcat http://localhost:8080/
cron表达式 上面的入门案例中我们指定了一个表达式:0/10 * * * * ?
这种表达式称为cron表达式,通过cron表达式可以灵活的定义出符合要求的程序执行的时间。
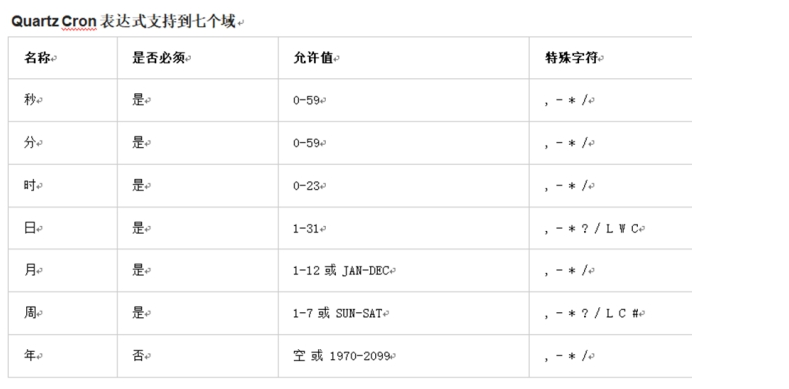
cron表达式分为七个域,之间使用空格分隔。其中最后一个域(年)可以为空。每个域都有自己允许的值和一些特殊字符构成。使用这些特殊字符可以使我们定义的表达式更加灵活。
下面是对这些特殊字符的介绍:
逗号(,):指定一个值列表,例如使用在月域上1,4,5,7表示1月、4月、5月和7月
横杠(-):指定一个范围,例如在时域上3-6表示3点到6点(即3点、4点、5点、6点)
星号(*):表示这个域上包含所有合法的值。例如,在月份域上使用星号意味着每个月都会触发
斜线(/):表示递增,例如使用在秒域上0/15表示每15秒
问号(?):只能用在日和周域上,但是不能在这两个域上同时使用。表示不指定,例如想在每月的20日触发调度,不管20日到底是星期几,则只能使用如下写法: 13 13 15 20 * ?, 其中最后一位只能用?,而不能使用 *,如果使用 * 表示不管星期几都会触发,实际上并不是这样。
井号(#):只能使用在周域上,用于指定月份中的第几周的哪一天,例如6#3,意思是某月的第三个周五 (6=星期五,3意味着月份中的第三周)
L:某域上允许的最后一个值。只能使用在日和周域上。当用在日域上,表示的是在月域上指定的月份的最后一天。用于周域上时,表示周的最后一天,就是星期六
W:W 字符代表着工作日 (星期一到星期五),只能用在日域上,它用来指定离指定日的最近的一个工作日
常用表达式例子 1 2 3 4 5 6 7 8 9 10 11 12 13 14 15 16 17 18 19 20 21 22 23 24 25 26 27 28 29 30 31 32 33 34 35 36 37 38 39 40 41 42 43 (1)0 0 2 1 * ? * 表示在每月的1日的凌晨2点调整任务
cron表达式在线生成器 前面介绍了cron表达式,但是自己编写表达式还是有一些困难的,我们可以借助一些cron表达式在线生成器来根据我们的需求生成表达式即可。
http://cron.qqe2.com/