本文最后更新于:3 个月前
spring-day04 第一章 声明式事务 第一节 JDBCTemplate 1. 简介 为了在特定领域帮助我们简化代码,Spring 封装了很多 『Template』形式的模板类。例如:RedisTemplate、RestTemplate 等等,包括我们今天要学习的 JDBCTemplate。
2. 准备工作 2.1 加入依赖 1 2 3 4 5 6 7 8 9 10 11 12 13 14 15 16 17 18 19 20 21 22 23 24 25 26 27 28 29 30 31 32 33 34 35 36 37 38 39 40 41 42 43 44 45 46 47 48 <dependencies > <dependency > <groupId > org.springframework</groupId > <artifactId > spring-context</artifactId > <version > 5.3.1</version > </dependency > <dependency > <groupId > org.springframework</groupId > <artifactId > spring-orm</artifactId > <version > 5.3.1</version > </dependency > <dependency > <groupId > org.springframework</groupId > <artifactId > spring-test</artifactId > <version > 5.3.1</version > </dependency > <dependency > <groupId > junit</groupId > <artifactId > junit</artifactId > <version > 4.12</version > <scope > test</scope > </dependency > <dependency > <groupId > mysql</groupId > <artifactId > mysql-connector-java</artifactId > <version > 5.1.3</version > </dependency > <dependency > <groupId > com.alibaba</groupId > <artifactId > druid</artifactId > <version > 1.0.31</version > </dependency > <dependency > <groupId > org.projectlombok</groupId > <artifactId > lombok</artifactId > <version > 1.18.8</version > <scope > provided</scope > </dependency > </dependencies >
2.2 数据源的属性文件jdbc.properties 1 2 3 4 atguigu.url =jdbc:mysql://localhost:3306/mybatis-example atguigu.driver =com.mysql.jdbc.Driver atguigu.username =root atguigu.password =123456
2.3 Spring 配置文件 2.3.1 配置数据源 1 2 3 4 5 6 7 8 9 <context:property-placeholder location ="classpath:jdbc.properties" /> <bean id ="dataSource" class ="com.alibaba.druid.pool.DruidDataSource" > <property name ="username" value ="${atguigu.username}" /> <property name ="password" value ="${atguigu.password}" /> <property name ="driverClassName" value ="${atguigu.driver}" /> <property name ="url" value ="${atguigu.url}" /> </bean >
2.3.2 配置 JDBCTemplate 1 2 3 4 5 <bean id ="jdbcTemplate" class ="org.springframework.jdbc.core.JdbcTemplate" > <property name ="dataSource" ref ="dataSource" /> </bean >
2.4 在测试类装配 JdbcTemplate 1 2 3 4 5 6 @RunWith(SpringJUnit4ClassRunner.class) @ContextConfiguration(locations = "classpath:spring-application.xml") public class TestJdbcTemplate @Autowired private JdbcTemplate jdbcTemplate;
2.5 JDBCTemplate的基本用法 2.5.1 增删改操作 1 2 3 4 5 6 7 8 9 10 @Test public void testInsert () "insert into t_emp (emp_name,emp_salary) values (?,?)" ;"aobama" ,3000d );@Test public void testUpdate () "update t_emp set emp_name=?,emp_salary=? where emp_id=?" ;"aolafu" ,6000d ,1 );
2.5.2 查询:返回单个简单类型 1 2 3 4 5 6 7 @Test public void testSelectCount () "select count(emp_id) from t_emp" ;
2.5.3 查询:返回实体类类型
封装实体类类型
1 2 3 4 5 6 7 8 9 10 11 12 13 14 package com.atguigu.pojo;import lombok.AllArgsConstructor;import lombok.Data;import lombok.NoArgsConstructor;@Data @AllArgsConstructor @NoArgsConstructor public class Employee private Integer empId;private String empName;private Double empSalary;
借助 RowMapper 完成查询
1 2 3 4 5 6 7 8 9 10 11 12 13 14 15 16 @Test public void testSelectOnRowToBean () "select emp_id empId,emp_name empName, emp_salary empSalary from t_emp where emp_id=?" ;new BeanPropertyRowMapper<>(Employee.class),1 );@Test public void testSelectRowsToBeanList () "select emp_id empId,emp_name empName, emp_salary empSalary from t_emp" ;new BeanPropertyRowMapper<>(Employee.class));
第二节 声明式事务的概述 1. 编程式事务 事务功能的相关操作全部通过自己编写代码来实现:
1 2 3 4 5 6 7 8 9 10 11 12 13 14 15 16 17 18 19 20 21 22 Connection conn = ...;try {false );catch (Exception e){finally {true );
编程式的实现方式存在缺陷:
细节没有被屏蔽:具体操作过程中,所有细节都需要程序员自己来完成,比较繁琐。
代码复用性不高:如果没有有效抽取出来,每次实现功能都需要自己编写代码,代码就没有得到复用。
2. 声明式事务 既然事务控制的代码有规律可循,代码的结构基本是确定的,所以框架就可以将固定模式的代码抽取出来,进行相关的封装。
封装起来后,我们只需要在配置文件中进行简单的配置即可完成操作。
好处1:提高开发效率
好处2:消除了冗余的代码
好处3:框架会综合考虑相关领域中在实际开发环境下有可能遇到的各种问题,进行了健壮性、性能等各个方面的优化
所以,我们可以总结下面两个概念:
编程式 :自己写代码 实现功能声明式 :通过配置 让框架 实现功能
3. 事务管理器 Spring中的声明式事务是通过事务管理器来进行事务管理的,所以在Spring中定义了事务管理器的顶级接口,针对各种不同的持久层框架,又定义了不同的事务管理器类来进行事务管理
3.1 顶级接口 3.1.1 Spring 5.2以前 1 2 3 4 5 public interface PlatformTransactionManager TransactionStatus getTransaction (TransactionDefinition definition) throws TransactionException ;void commit (TransactionStatus status) throws TransactionExceptionvoid rollback (TransactionStatus status) throws TransactionException
3.1.2 从 Spring 5.2开始 PlatformTransactionManager 接口本身没有变化,它继承了 TransactionManager
1 2 3 public interface TransactionManager
TransactionManager接口中什么都没有,但是它还是有存在的意义——定义一个技术体系。
3.2 事务管理器的体系结构
我们现在要使用的事务管理器是org.springframework.jdbc.datasource.DataSourceTransactionManager ,将来整合 Mybatis 用的也是这个类。
DataSourceTransactionManager类中的主要方法:
doBegin():开启事务
doSuspend():挂起事务(暂停事务)
doResume():恢复挂起的事务
doCommit():提交事务
doRollback():回滚事务
如果持久层使用Hibernate框架的话,则需要使用HibernateTransactionManager
第三节 基于注解的声明式事务 1. 准备工作 1.1 引入依赖 1 2 3 4 5 6 7 8 9 10 11 12 13 14 15 16 17 18 19 20 21 22 23 24 25 26 27 28 29 30 31 32 33 34 35 36 37 38 39 40 41 42 43 44 45 46 47 48 49 50 51 52 <dependencies > <dependency > <groupId > org.springframework</groupId > <artifactId > spring-context</artifactId > <version > 5.3.1</version > </dependency > <dependency > <groupId > org.springframework</groupId > <artifactId > spring-orm</artifactId > <version > 5.3.1</version > </dependency > <dependency > <groupId > org.springframework</groupId > <artifactId > spring-test</artifactId > <version > 5.3.1</version > </dependency > <dependency > <groupId > junit</groupId > <artifactId > junit</artifactId > <version > 4.12</version > <scope > test</scope > </dependency > <dependency > <groupId > mysql</groupId > <artifactId > mysql-connector-java</artifactId > <version > 5.1.3</version > </dependency > <dependency > <groupId > com.alibaba</groupId > <artifactId > druid</artifactId > <version > 1.0.31</version > </dependency > <dependency > <groupId > org.projectlombok</groupId > <artifactId > lombok</artifactId > <version > 1.18.8</version > <scope > provided</scope > </dependency > </dependencies >
1.2 数据源的属性文件 1 2 3 4 atguigu.url =jdbc:mysql://localhost:3306/mybatis-example atguigu.driver =com.mysql.jdbc.Driver atguigu.username =root atguigu.password =123456
1.3 Spring 配置文件 1 2 3 4 5 6 7 8 9 10 11 12 13 14 15 16 17 18 19 20 21 22 23 24 25 <?xml version="1.0" encoding="UTF-8"?> <beans xmlns ="http://www.springframework.org/schema/beans" xmlns:xsi ="http://www.w3.org/2001/XMLSchema-instance" xmlns:context ="http://www.springframework.org/schema/context" xsi:schemaLocation ="http://www.springframework.org/schema/beans http://www.springframework.org/schema/beans/spring-beans.xsd http://www.springframework.org/schema/context https://www.springframework.org/schema/context/spring-context.xsd" ><context:component-scan base-package ="com.atguigu" /> <context:property-placeholder location ="classpath:jdbc.properties" /> <bean id ="dataSource" class ="com.alibaba.druid.pool.DruidDataSource" > <property name ="username" value ="${atguigu.username}" /> <property name ="password" value ="${atguigu.password}" /> <property name ="driverClassName" value ="${atguigu.driver}" /> <property name ="url" value ="${atguigu.url}" /> </bean > <bean id ="jdbcTemplate" class ="org.springframework.jdbc.core.JdbcTemplate" > <property name ="dataSource" ref ="dataSource" /> </bean > </beans >
1.4 数据建模 1.4.1 物理建模 1 2 3 4 5 6 7 8 9 CREATE TABLE t_account(
1.4.2 逻辑建模 1 2 3 4 5 6 7 8 @Data @AllArgsConstructor @NoArgsConstructor public class Account private Integer accountId;private String accountName;private Double money;
1.5 创建持久层组件 1.5.1 AccountDao接口 1 2 3 4 5 6 7 8 9 10 package com.atguigu.dao;public interface AccountDao void updateAccountMoney (Integer accountId,Double money)
1.5.2 AccountDaoImpl实现类 1 2 3 4 5 6 7 8 9 10 11 12 13 14 15 16 17 package com.atguigu.dao.impl;import com.atguigu.dao.AccountDao;import org.springframework.beans.factory.annotation.Autowired;import org.springframework.jdbc.core.JdbcTemplate;import org.springframework.stereotype.Repository;@Repository public class AccountDaoImpl implements AccountDao @Autowired private JdbcTemplate jdbcTemplate;@Override public void updateAccountMoney (Integer accountId, Double money) "update t_account set money=money+? where account_id=?" ;
1.6 创建业务层组件 1.6.1 AccountService接口 1 2 3 4 5 6 7 8 9 10 11 package com.atguigu.service;public interface AccountService void transfer (Integer fromId,Integer toId,Double money)
1.6.2 AccountServiceImpl实现类 1 2 3 4 5 6 7 8 9 10 11 12 13 14 15 16 17 18 19 20 21 package com.atguigu.service.impl;import com.atguigu.dao.AccountDao;import com.atguigu.service.AccountService;import org.springframework.beans.factory.annotation.Autowired;import org.springframework.stereotype.Service;@Service public class AccountServiceImpl implements AccountService @Autowired private AccountDao accountDao;@Override public void transfer (Integer fromId, Integer toId, Double money) int num = 10 /0 ;
1.7 测试类 1 2 3 4 5 6 7 8 9 10 11 12 13 14 15 16 17 18 19 package com.atguigu;import com.atguigu.service.AccountService;import org.junit.Test;import org.junit.runner.RunWith;import org.springframework.beans.factory.annotation.Autowired;import org.springframework.test.context.ContextConfiguration;import org.springframework.test.context.junit4.SpringJUnit4ClassRunner;@RunWith(SpringJUnit4ClassRunner.class) @ContextConfiguration(locations = "classpath:spring-application.xml") public class TestTransaction @Autowired private AccountService accountService;@Test public void testTransfer () 1 ,2 ,500d );
2. 进行基于注解的声明式事务的配置 2.1 配置事务管理器 在spring的配置文件中配置事务管理器对象
1 2 3 4 5 <bean id ="transactionManager" class ="org.springframework.jdbc.datasource.DataSourceTransactionManager" > <property name ="dataSource" ref ="dataSource" /> </bean >
2.2 开启基于注解的声明式事务功能 在spring的配置文件中开启基于注解的声明式事务功能
1 2 3 4 5 6 <tx:annotation-driven />
注意:导入名称空间时有好几个重复的,我们需要的是 tx 结尾 的那个。
2.3 在需要事务的方法上使用注解 1 2 3 4 5 6 7 8 9 10 @Transactional @Override public void transfer (Integer fromId, Integer toId, Double money) int num = 10 /0 ;
2.4 执行测试 1 2 3 4 5 6 7 8 9 10 11 12 13 14 15 16 17 18 19 20 package com.atguigu;import com.atguigu.service.AccountService;import org.junit.Test;import org.junit.runner.RunWith;import org.springframework.beans.factory.annotation.Autowired;import org.springframework.test.context.ContextConfiguration;import org.springframework.test.context.junit4.SpringJUnit4ClassRunner;@RunWith(SpringJUnit4ClassRunner.class) @ContextConfiguration(locations = "classpath:spring-application.xml") public class TestTransaction @Autowired private AccountService accountService;@Test public void testTransfer () 1 ,2 ,500d );
3. 从日志内容角度查看事务效果 3.1 加入依赖 1 2 3 4 5 6 <dependency > <groupId > ch.qos.logback</groupId > <artifactId > logback-classic</artifactId > <version > 1.2.3</version > </dependency >
3.2 加入logback的配置文件 文件名:logback.xml
1 2 3 4 5 6 7 8 9 10 11 12 13 14 15 16 17 18 19 20 21 22 23 24 <?xml version="1.0" encoding="UTF-8"?> <configuration debug ="true" > <appender name ="STDOUT" class ="ch.qos.logback.core.ConsoleAppender" > <encoder > <pattern > [%d{HH:mm:ss.SSS}] [%-5level] [%thread] [%logger] [%msg]%n</pattern > </encoder > </appender > <root level ="INFO" > <appender-ref ref ="STDOUT" /> </root > <logger name ="org.springframework.jdbc.datasource.DataSourceTransactionManager" level ="DEBUG" /> <logger name ="org.springframework.jdbc.core.JdbcTemplate" level ="DEBUG" /> </configuration >
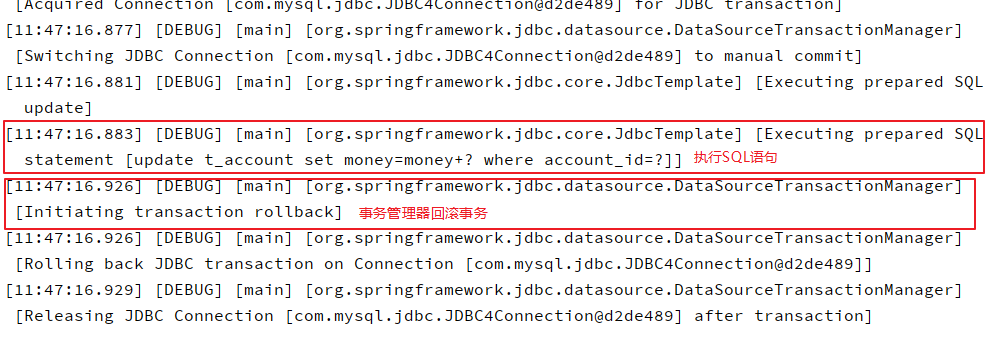
3.3 观察日志打印
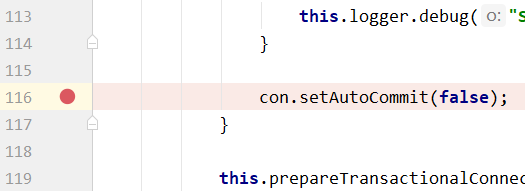
4. debug查看事务管理器中的关键方法 需要查看的类:org.springframework.jdbc.datasource.DataSourceTransactionManager
4.1 开启事务的方法
4.2 提交事务的方法
4.3 回滚事务的方法
第四节 事务属性 1. 只读属性 1.1 简介 对一个查询操作来说,如果我们把它设置成只读,就能够明确告诉数据库,这个操作不涉及写操作。这样数据库就能够针对查询操作来进行优化。但是如果你的方法中执行写操作,那么就会报错
1.2 设置方式 1 2 3 4 5 6 7 8 9 @Transactional(read-only=true) @Override public void transfer (Integer fromId, Integer toId, Double money)
1.3 如果在设置了只读的事务中进行写操作 会抛出下面异常:
Caused by: java.sql.SQLException: Connection is read-only. Queries leading to data modification are not allowed
1.4 如果将@Transactional注解放在类上 1.4.1 生效原则 如果一个类中每一个方法上都使用了@Transactional注解,那么就可以将@Transactional注解提取到类上。反过来说:@Transactional注解在类级别标记,会影响到类中的每一个方法。同时,类级别标记的@Transactional注解中设置的事务属性也会延续影响到方法执行时的事务属性。除非在方法上又设置了@Transactional注解。
对一个方法来说,离它最近的@Transactional注解中的事务属性设置生效。
1.4.2 用法举例 在类级别@Transactional注解中设置只读,这样类中所有的查询方法都不需要设置@Transactional注解了。因为对查询操作来说
,其他属性通常不需要设置,所以使用公共设置即可。
然后在这个基础上,对增删改方法设置@Transactional注解 readOnly 属性为 false。
1 2 3 4 5 6 7 8 9 10 11 12 13 14 15 16 17 18 19 20 21 22 23 24 25 26 27 28 29 30 package com.atguigu.service.impl;import com.atguigu.dao.AccountDao;import com.atguigu.service.AccountService;import org.springframework.beans.factory.annotation.Autowired;import org.springframework.stereotype.Service;import org.springframework.transaction.annotation.Transactional;@Transactional(readOnly = true) @Service public class AccountServiceImpl implements AccountService @Autowired private AccountDao accountDao;@Transactional(readOnly = false) @Override public void transfer (Integer fromId, Integer toId, Double money)
PS:Spring 环境下很多场合都有类似设定,一个注解如果标记了类的每一个方法那么通常就可以提取到类级别。但是,如果不是类中的所有方法都需要用到事务,则绝不允许将@Transaction注解放在类上
2. 超时属性 2.1 简介 事务在执行过程中,有可能因为遇到某些问题,导致程序卡住,从而长时间占用数据库资源。而长时间占用资源,大概率是因为程序运行出现了问题(可能是Java程序或MySQL数据库或网络连接等等)。
此时这个很可能出问题的程序应该被回滚,撤销它已做的操作,事务结束,把资源让出来,让其他正常程序可以执行。
概括来说就是一句话:超时回滚,释放资源。
2.2 设置方式 1 2 3 4 5 6 7 8 9 10 11 @Transactional(readOnly = false, timeout = 3) public void updateTwice ( // 修改员工姓名的一组参数 Integer empId4EditName, String newName, // 修改员工工资的一组参数 Integer empId4EditSalary, Double newSalary )
2.3 模拟超时 1 2 3 4 5 6 7 8 9 10 public void updateEmpSalaryById (Integer empId, Double salary) try {5 );catch (InterruptedException e) {"update t_emp set emp_salary=? where emp_id=?" ;
PS:注意:sleep操作如果放在执行 SQL 语句后面那就不起作用。
2.4 执行效果 执行过程中日志和抛出异常的情况:
[16:25:41.706] [DEBUG] [main] [org.springframework.jdbc.datasource.DataSourceTransactionManager] [Initiating transaction rollback] [16:25:41.706] [DEBUG] [main] [org.springframework.jdbc.datasource.DataSourceTransactionManager] [Rolling back JDBC transaction on Connection [com.mysql.jdbc.JDBC4Connection@53b7f657]] [16:25:41.709] [DEBUG] [main] [org.springframework.jdbc.datasource.DataSourceTransactionManager] [Releasing JDBC Connection [com.mysql.jdbc.JDBC4Connection@53b7f657] after transaction]
org.springframework.transaction.TransactionTimedOutException : Transaction timed out: deadline was Fri Jun 04 16:25:39 CST 2021
3. 回滚和不回滚的异常属性 3.1 默认情况 默认只针对运行时异常回滚,编译时异常不回滚。情景模拟代码如下:
1 2 3 4 5 6 7 8 9 10 11 12 13 @Transactional @Override public void transfer (Integer fromId, Integer toId, Double money) throws ClassNotFoundException"com.mysql.jdbc.Driveraaaaaa" );int num = 10 /0 ;
3.2 设置回滚的异常
rollbackFor属性:需要设置一个Class类型的对象
rollbackForClassName属性:需要设置一个字符串类型的全类名
1 @Transactional(rollbackFor = Exception.class)
3.3 设置不回滚的异常 在默认设置和已有设置的基础上,再指定一个异常类型,碰到它不回滚。
1 2 3 @Transactional( noRollbackFor = FileNotFoundException.class )
3.4 如果回滚和不回滚异常同时设置 3.4.1 当两者范围不同 不管是哪个设置范围大,都是在大范围内在排除小范围的设定。例如:
rollbackFor = Exception.class
noRollbackFor = FileNotFoundException.class
意思是除了 FileNotFoundException 之外,其他所有 Exception 范围的异常都回滚;但是碰到 FileNotFoundException 不回滚。
3.4.2 当两者范围相同(傻子才会这样去设置)
noRollbackFor = FileNotFoundException.class
rollbackFor = FileNotFoundException.class
此时 Spring 采纳了 rollbackFor 属性的设定:遇到 FileNotFoundException 异常会回滚。
4. 事务隔离级别属性 4.1 回顾事务的隔离级别
级别 名字 隔离级别 脏读 不可重复读 幻读 数据库默认隔离级别
1 读未提交
read uncommitted
是
是
是
一般不使用
2 读已提交
read committed
否
是
是
Oracle
3 可重复读
repeatable read
否
否
是
MySQL
4 串行化
serializable
否
否
否
最高的隔离级别
4.2 设置方式 在 @Transactional 注解中使用 isolation 属性设置事务的隔离级别。 取值使用 org.springframework.transaction.annotation.Isolation 枚举类提供的数值。
1 @Transactional(isolation = Isolation.READ_UNCOMMITTED)
我们一般不需要去设置事务的隔离级别,绝大多数情况下使用默认的隔离级别就行
5. 事务传播行为属性 5.1 事务传播行为要研究的问题 事务的传播行为要研究的是是当两个方法嵌套执行的时候,外层方法的事务能否传播到内层方法以及怎么传播到外层方法
5.2 propagation属性 5.2.1 默认值 @Transactional 注解通过 propagation 属性设置事务的传播行为。它的默认值是:
1 Propagation propagation () default Propagation.REQUIRED ;
5.2.2 可选值说明 propagation 属性的可选值由 org.springframework.transaction.annotation.Propagation 枚举类提供:
名称
含义
REQUIRED 默认值
当前方法必须工作在事务中 如果当前线程上有已经开启的事务可用,那么就在这个事务中运行 如果当前线程上没有已经开启的事务,那么就自己开启新事务,在新事务中运行 所以当前方法有可能和其他方法共用事务 在共用事务的情况下:当前方法会因为其他方法回滚而受连累
REQUIRES_NEW 建议使用当前方法必须工作在事务中 不管当前线程上是否有已经开启的事务,都要开启新事务 在新事务中运行 不会和其他方法共用事务,避免被其他方法连累。如果外层已经有事务,就先将它挂起,内层方法新建实物,内层方法新建实物执行完之后再恢复外层事务
SUPPORTS(支持)
如果外层方法有事务,内层方法则会参与进外层事务一起执行,如果外层方法没有事务,那么内层方法则是以非事务方式运行
NOT_SUPPORTED
如果外层方法有事务,则先将外层方法事务挂起,内层以非事务方法执行。执行完之后再恢复外层事务(不支持事务)
MANDATORY(强制性的)
如果外层方法有事务,内层方法则会参与外层事务一起执行,如果外层方法没有事务,则抛出异常,强制从外层方法必须有事务
NEVER
只能以非事务方式运行,如果外层方法有事务 直接抛出异常
NESTED
新建一个嵌套事务,在嵌套事务中执行,设置了一个回滚点。有点类似REQUIRED
5.3 测试事务的传播行为 5.3.1 在业务层中声明两个内层方法 1 2 3 4 5 6 7 8 9 10 11 12 @Transactional(propagation = Propagation.REQUIRED) @Override public void updateAccountNameInner (Integer accountId, String accountName) int num = 10 /0 ;@Transactional(propagation = Propagation.REQUIRED) @Override public void updateAccountMoney (Integer accountId, Double money)
5.3.2 创建TopService 1 2 3 4 5 6 7 8 9 10 11 12 13 14 15 16 17 18 19 20 package com.atguigu.service.impl;import com.atguigu.service.AccountService;import com.atguigu.service.TopService;import org.springframework.beans.factory.annotation.Autowired;import org.springframework.stereotype.Service;import org.springframework.transaction.annotation.Transactional;@Service public class TopServiceImpl implements TopService @Autowired private AccountService accountService;@Transactional @Override public void topTxMethod () 1 ,2000d );1 ,"hello" );
5.3.3 junit测试方法 1 2 3 4 5 6 7 8 9 10 11 12 13 14 15 16 17 18 19 20 21 22 23 package com.atguigu;import com.atguigu.service.AccountService;import com.atguigu.service.TopService;import org.junit.Test;import org.junit.runner.RunWith;import org.springframework.beans.factory.annotation.Autowired;import org.springframework.test.context.ContextConfiguration;import org.springframework.test.context.junit4.SpringJUnit4ClassRunner;@RunWith(SpringJUnit4ClassRunner.class) @ContextConfiguration(locations = "classpath:spring-application.xml") public class TestTransaction @Autowired private AccountService accountService;@Autowired private TopService topService;@Test public void testPropagation ()
5.3.4 测试 REQUIRED 模式
效果:内层方法A、内层方法B所做的修改都没有生效,总事务回滚了。
5.3.5 测试 REQUIRES_NEW 模式 修改 EmpService 中内层方法
1 2 3 4 5 6 7 8 9 10 11 @Transactional(readOnly = false, propagation = Propagation.REQUIRES_NEW) public void updateEmpNameInner (Integer empId, String empName) @Transactional(readOnly = false, propagation = Propagation.REQUIRES_NEW) public void updateEmpSalaryInner (Integer empId, Double empSalary)
效果:内层方法A的修改生效了、内层方法B所做的修改都没有生效,总事务回滚了。
5.3.6 实际开发情景 Service方法应用了通知
过滤器或拦截器等类似组件
我们在事务传播行为这里,使用 REQUIRES_NEW 属性,也可以说是让不同事务方法从事务的使用上解耦合 ,不要互相影响。
第五节 基于XML配置声明式事务(了解) 1. 加入依赖 相比于基于注解的声明式事务,基于 XML 的声明式事务需要一个额外的依赖:
1 2 3 4 5 <dependency > <groupId > org.springframework</groupId > <artifactId > spring-aspects</artifactId > <version > 5.3.1</version > </dependency >
2. 迁移代码 将上一个基于注解的 module 中的代码转移到新module。去掉 @Transactional 注解。
3. 修改 Spring 配置文件 去掉 tx:annotation-driven 标签,然后加入下面的配置:
1 2 3 4 5 6 7 8 9 10 11 12 13 14 15 16 17 18 19 20 21 22 23 24 25 <tx:advice id ="adv1" > <tx:attributes > <tx:method name ="transfer" rollback-for ="java.lang.Exception" propagation ="REQUIRES_NEW" /> </tx:attributes > </tx:advice > <aop:config > <aop:pointcut id ="pt1" expression ="execution(public void com.atguigu.service.impl.AccountServiceImpl.transfer(Integer,Integer,Double))" /> <aop:advisor advice-ref ="adv1" pointcut-ref ="pt1" /> </aop:config >
4. 注意 即使需要事务功能的目标方法已经被切入点表达式涵盖到了,但是如果没有给它配置事务属性,那么这个方法就还是没有事务。所以事务属性必须配置。
第三章 Spring5的新特性 第一节 JSR305标准相关注解 1. JSR的概述 1.1 JCP JCP(Java Community Process) 是一个由SUN公司发起的,开放的国际组织。主要由Java开发者以及被授权者组成,负责Java技术规范维护,Java技术发展和更新。
JCP官网地址:https://jcp.org/en/home/index
1.2 JSR JSR 的全称是:Java Specification Request,意思是 Java 规范提案。谁向谁提案呢?任何人都可以向 JCP (Java Community Process) 提出新增一个标准化技术规范的正式请求。JSR已成为Java界的一个重要标准。登录 JCP 官网 可以查看所有 JSR 标准 。
2. JSR 305的规范 JSR 305: Annotations for Software Defect Detection
This JSR will work to develop standard annotations (such as @NonNull) that can be applied to Java programs to assist tools that detect software defects.
主要功能:使用注解(例如@NonNull等等)协助开发者侦测软件缺陷。
Spring 从 5.0 版本开始支持了 JSR 305 规范中涉及到的相关注解。
1 2 3 4 5 6 7 8 9 10 11 12 13 14 15 16 17 18 19 20 21 22 23 24 25 26 27 28 29 30 31 32 33 34 35 package org.springframework.lang;import java.lang.annotation.Documented;import java.lang.annotation.ElementType;import java.lang.annotation.Retention;import java.lang.annotation.RetentionPolicy;import java.lang.annotation.Target;import javax.annotation.Nonnull;import javax.annotation.meta.TypeQualifierNickname;@Target({ElementType.METHOD, ElementType.PARAMETER, ElementType.FIELD}) @Retention(RetentionPolicy.RUNTIME) @Documented @Nonnull @TypeQualifierNickname public @interface NonNull {
3. 相关注解
注解名称
含义
可标记位置
@Nullable
可以为空
@Target({ElementType.METHOD , ElementType.PARAMETER , ElementType.FIELD })
@NonNull
不应为空
@Target({ElementType.METHOD , ElementType.PARAMETER , ElementType.FIELD })
@NonNullFields
在特定包下的字段不应为空
@Target(ElementType.PACKAGE ) @TypeQualifierDefault(ElementType.FIELD )
@NonNullApi
参数和方法返回值不应为空
@Target(ElementType.PACKAGE ) @TypeQualifierDefault({ElementType.METHOD , ElementType.PARAMETER })
第二节 整合junit5 1. 导入依赖 在原有环境基础上增加如下依赖:
1 2 3 4 5 6 7 8 9 10 11 <dependency > <groupId > org.junit.jupiter</groupId > <artifactId > junit-jupiter-api</artifactId > <version > 5.7.0</version > <scope > test</scope > </dependency > <dependency > <groupId > org.springframework</groupId > <artifactId > spring-test</artifactId > <version > 5.3.1</version > </dependency >
2. 创建测试类
@ExtendWith(SpringExtension.class) 表示使用 Spring 提供的扩展功能。
@ContextConfiguration(value = {“classpath:spring-context.xml”}) 还是用来指定 Spring 配置文件位置,和整合 junit4 一样。
1 2 3 4 5 6 7 8 9 10 11 12 13 14 15 16 17 18 19 20 21 package com.atguigu;import com.atguigu.config.AtguiguSpringConfiguration;import com.atguigu.service.AccountService;import org.junit.jupiter.api.Test;import org.junit.jupiter.api.extension.ExtendWith;import org.springframework.beans.factory.annotation.Autowired;import org.springframework.test.context.ContextConfiguration;import org.springframework.test.context.junit.jupiter.SpringExtension;@ExtendWith(SpringExtension.class) @ContextConfiguration(classes = AtguiguSpringConfiguration.class) public class TestTransaction @Autowired private AccountService accountService;@Test public void testTransfer () throws ClassNotFoundException 1 ,2 ,500d );
3. 使用复合注解 @SpringJUnitConfig 注解综合了前面两个注解的功能,此时指定 Spring 配置文件位置即可。但是注意此时需要使用 locations 属性,不是 value 属性了。
1 2 3 4 5 6 7 8 9 10 11 12 13 14 15 16 17 package com.atguigu;import com.atguigu.config.AtguiguSpringConfiguration;import com.atguigu.service.AccountService;import org.junit.jupiter.api.Test;import org.springframework.beans.factory.annotation.Autowired;import org.springframework.test.context.junit.jupiter.SpringJUnitConfig;@SpringJUnitConfig(AtguiguSpringConfiguration.class) public class TestTransaction @Autowired private AccountService accountService;@Test public void testTransfer () throws ClassNotFoundException 1 ,2 ,500d );